With the right tools and software, everyone can make professional-looking, high-quality videos. In this Movavi Video Editor review, I will discuss each aspect of the editor that will help you create professional-looking videos easily.
Quick Summary
Pros
- Extremely easy to use
- Rapid Improvements
- Lot of Handy Tools
- AI tools
- 4K Rendering
Cons
- It does not support H.265
- Free trial limitations
overall
USD 35.99
Supported Platforms: Windows, OSX
Interface
5/5
Features
4/5
Performance
5/5
Support
4/5
Movavi Video Editor is one of the best video editing software for beginners. It helps you to create amazing videos with minimum time and effort. In short, the editor has all the features to make your video stand out from the crowd with your creativity.
It has a user-centric approach and a host of video editing features. These include special effects and Transitions, Keyframe Animations, pre-made Intros, and Chroma Key.
Pricing
It falls under two pricing plans in USD:
The one-year subscription version of Movavi Video Editor covers 1 PC or 1 Mac and costs USD 54.95. However, a lifetime license covering 1 PC costs USD 79.95. Using our Movavi Discount Coupons, you can buy the subscription of your choice at an almost 65% discount.
If you are looking for good video editing program alternatives that provide a lifetime license, you can try Wondershare Filmora & AVS Video Editor, which uniquely supports lifetime free upgrades as well.
If you wish to have an all-in-one Video and Audio Editor with Editing, Converting, Screen Recording, and CD/DVD Burning capabilities, I suggest trying Movavi Video Suite.
You can read my Movavi Video Suite Review to know more about the features if you decide to go for it.
I recommend you use the Free Trial version of any video editing program before making your purchase decision. However, I will try my best to help you with the feature and the real feel throughout this Movavi Video Editor review.
Movavi Video Editor 15 Vs Editor 2026
Note: Video Editor 15 is not on sale anymore. We contacted their support, and here is what they have to say:
No further functionality development will be released for this version. However, if any critical issue arises, for example rendering the program completely unusable due to a Windows update - we will be releasing an update to address such issue. That has happened in the past and can happen in the future.
Feature | Movavi Video Editor 15 | Video Editor 2024 | Video Editor 2025 | Video Editor 2026 |
|---|---|---|---|---|
New Interface | No | Yes | Yes | Yes |
LUTs | No | Yes | Yes | Yes |
Audio synchronization | No | Yes | Yes | Yes |
Animation | No | Yes | Yes | Yes |
Audio Effects | No | Yes | Yes | Yes |
Sound autocorrect | No | Yes | Yes | Yes |
Automatic Subtitles | No | No | Yes | Yes |
Subtitle Translation | No | No | No | Yes |
Export Captions | No | No | No | No |
AI Background removal | No | Yes | Yes | Yes |
AI Noise removal | No | Yes | Yes | Yes |
Silence removal | No | No | No | Yes |
AI Motion tracking | No | Yes | Yes | Yes |
Blending Modes | No | Yes | Yes | Yes |
Try Exclusive Effects (Movavi Effects Store subscription needed) | No | No | Yes | Yes |
Movavi Video Editor: Key Features Review
Basic Video Editing Tools
Movavi Video Editor offers a plethora of tools for a hassle-free video editing workflow. But first, let's start with the basics.
Trimming
Movavi Video Editor makes it easy to trim down sections from lengthy video files, keeping only essential moments. The program features three different methods to do so:
- Adjust clip edges: You can easily drag the edges of a selected clip in the timeline to adjust its start and end points.
- Use Blade Tool: Once done, you can apply the blade tool to make multiple precise cuts on the clips and remove the unnecessary bits. For better accuracy, you can use the Marker tool to mark exact points before cutting.
- Split Tool: You can split parts from a clip by placing the orange playhead at the desired spot and clicking the Split option from the toolbar or by holding Ctrl+B. It is the best use case during playback-based editing.
Effects and Filters
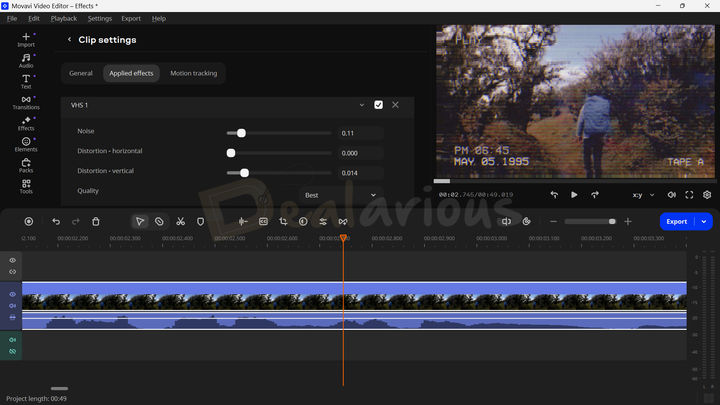
Achieving the right tone and creating stunning visual effects is a complex task. To address this challenge, Movavi Video Editor includes a variety of built-in filters and effects presets. You can use them in your videos to create the right tone and portray the perfect shot to your audience. Applying these effects and Filters is as easy as dragging and dropping them into the desired clip in the timeline.
Movavi Video Editor's VHS effects collection is my current favorite. I am also impressed with the latest update, which adds further customization options. I could tweak the effects' different parts, such as noise level, distortion, brightness, blending, etc. It helped me achieve the perfect look I aimed for.
Tip: Once you've adjusted the effect to your liking, copy and paste the same across other clips. It will help you maintain a consistent look and feel.
Variety of Transitions
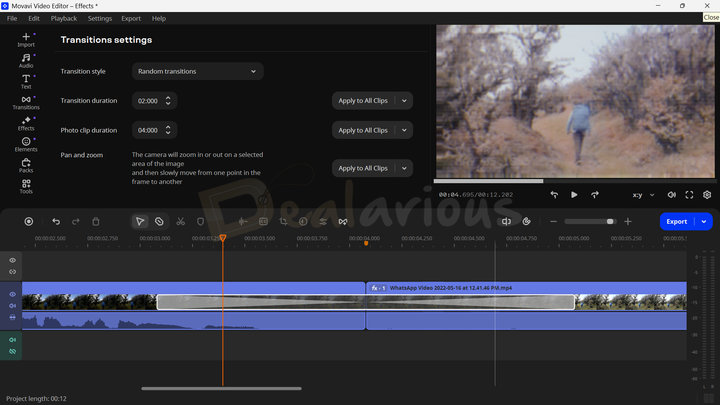
Most videos consist of multiple scenes and clips composed into one. However, if the transitions from one scene to the other aren't very smooth and natural, they might disconnect the users.
Movavi Video Editor offers many types of transitions. To achieve a smooth transition effect, you must add a transition between two clips. The program offers greater control over transition effects. You can adjust the transition style and duration limits, adjust the Photo clip duration, and incorporate Pan and zoom effects within the applied transitions. Furthermore, you can also fill transitions in three different ways, such as Trimming content, Freezing frame, and Slow motion.
Note: While Movavi Video Editor offers several free attention-grabbing transition effects, some themed collections need to be purchased separately.
Support for LUTs
LUT is short for 'LookUp Table.' This feature helps transform color input values on your video to any other color output values. It gives your final footage a very different look & feel.
Movavi Video Editor lets you import and apply LUT effects in .cube format, allowing you to easily recreate the color schemes from other movies. You can also adjust the LUT intensity by moving the slider, which helps you tweak the entire atmosphere to your liking.
Record Audio and Video
Besides importing media files from your local drive, Movavi Video Editor lets you record audio and video from within the app. It minimizes the need for third-party apps, letting you instantly add your recorded clips to the timeline—no extra setup needed.
The Record Video feature lets you adjust your preferences, such as selecting the video capture device, resolution, frame rate, and audio capture device, before recording. Similarly, to record voice-overs, you can use the Record Audio feature, select your preferred audio device, and adjust the volume.
Advanced Video Editing Tools
Now, let's look into the advanced video editing features of Movavi Video Editor. These tools give you greater control over your video, helping you achieve a professional look.
Color Adjustments
This tool gives precise color adjustment options for your video clips. There are two modes.
The 'Presets' mode offers Auto contrast, Auto saturation, Auto white balance, Magic enhance, and more. The 'Manual mode' option allows you to tweak White balance, Brightness, Contrast, Saturation, Highlights, Gamma, Shadows, Hue, Temperature, and Tint.
Professional editors might find the color corrections basic. However, Movavi Video Editor balances this gap by offering creative control with its effects pack. Additionally, applying LUTs provides an added advantage for maintaining a consistent visual style throughout the video.
Blending Modes
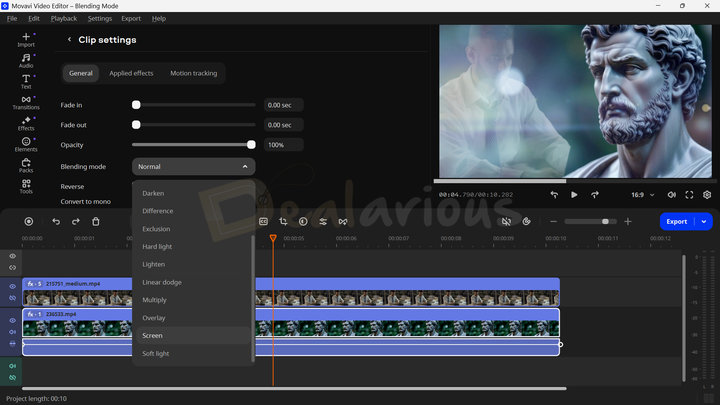
Movavi Video Editor has 13 different Blending modes that help you fine-tune your videos. This feature is especially useful when working with overlapping videos, images, or effects. It allows you to merge two clips creatively for a more dynamic and visually appealing result.
Besides that, Movavi Video Editor has a good collection of built-in overlay effects. This integration keeps your entire editing workflow within the program, minimizing the need to search and import different effects separately.
Scene detection
So far, this is one of my favorite features in Movavi Video Editor. The Scene detection tool automatically detects scenes from a video based on the selected scene duration and splits them into separate clips with a single click.
It is ideal for creating short clips or snippets from long videos for social media content. It saves a huge amount of time that would otherwise be spent on manually reviewing and splitting scenes from lengthy footage.
How long the processing takes mainly depends on your video's duration, resolution, frame rate, and bitrate. I tested it with 10-minute-long 2K Video footage, and it took around 3 minutes to detect scene changes at 1-second intervals. The result was quite accurate.
Stabilization
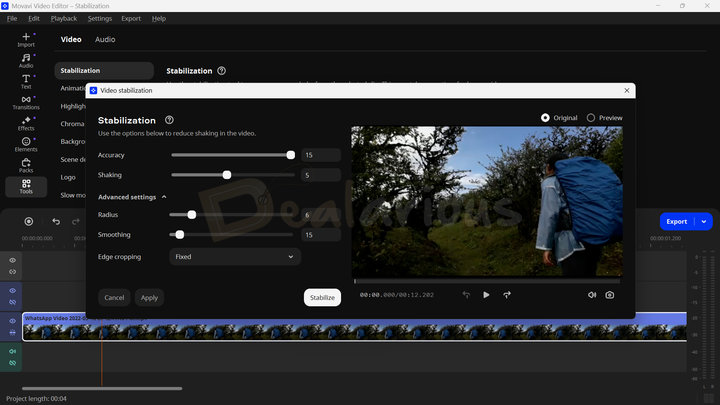
If you are into travel vlogging, you know how difficult it is to fix handheld, unstabilized footage during editing. Fortunately, Movavi Video Editor's Stabilization feature handles this challenge impressively well. This tool helps you eliminate unnecessary camera shakes by tweaking key parameters like Accuracy, Shaking, Radius, Smoothing, and Edge cropping. You can play around with these parameters until you find the sweet spot.
During my Movavi Video Editor review, I found the tool easy to use and effective. However, I was mostly impressed by its flexibility. I could experiment with different settings and re-adjust them if the result was unsatisfactory, without losing previous configurations.
Chroma key
Popularly known as the green screen, Chroma Key is a video editor's favorite tool. Located under the More Tools tab, it lets you remove and convert any color to a transparent background. Using this tool is as easy as selecting the color with the color picker and adjusting different parameters like Color, Tolerance, Noise, Edges, and Opacity to achieve a more polished look.
Audio Editing Tools
Sound Auto Correct
Movavi Video Editor's Sound Autocorrect feature helps you remove unwanted background noise from your audio with the help of 3 presets: Enhanced voice recording, Noisy place, and Recording studio.
To test their capability, I recorded a 30-second audio clip using an earphone while a high-speed fan was running. The recording had noticeable wind noise, and my voice was fairly audible.
All the presets did a decent job handling the noise. However, in my experience, the Enhanced voice recording preset delivered the best balance between clarity and adequate noise reduction. Overall, the feature is quite handy and can be used for quick audio cleanups. To polish your audio further, you can later use the Noise Gate and Compressor features.
Note: These presets may not help with recordings in extremely loud environments.
Synchronization
Fixing mismatched audio and visuals is a time-consuming task, but the Synchronization feature simplifies this process. It automatically checks for audio streams in different clips and syncs them in the timeline. It is ideal when you record audio and video using two different devices.
Using this feature is simple. Place both audio clips on separate tracks, select them, and hit Synchronize. The tool will automatically adjust one track to match the others' peaks.
Beat Detection
It is another handy inclusion in the Audio section. The Beat detection feature efficiently detects audio beats in your video and displays them on your timeline. Once the beats are detected, you can adjust their tempo or make precise cuts and adjustments to further enhance your video project.
Silence Removal (New)
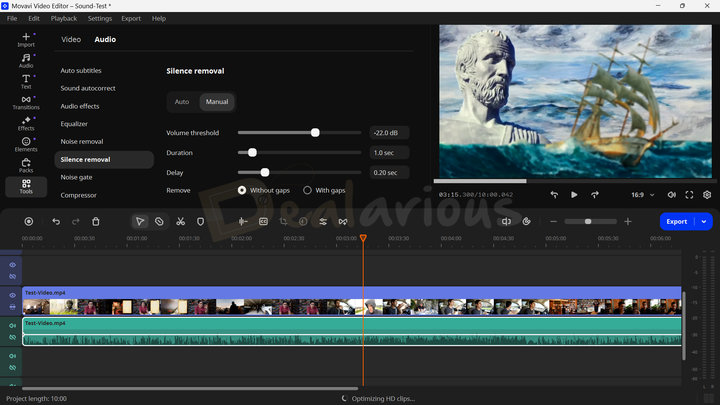
This new feature in Movavi Video Editor helps remove long, awkward pauses in your video. The Silence removal tool can automatically detect silent intervals, remove them, and join the gaps to keep the video engaging.
For more control, you can use manual mode. You can tweak different settings like volume threshold, duration, and delay, as well as how the cuts should be applied after detection with gaps or without gaps in the timeline. Perfect for editing podcasts, interviews, and tutorials, where long silences often slow down the video flow.
AI Tools
The AI features in Movavi Video Editor are designed to streamline your workflow, and my experience with the tools was no different.
AI Motion Tracking
Editing only a moving object can be a challenging task. Therefore, Movavi has integrated a motion tracking feature into its video editor. It simplifies the process further with the help of AI. With this feature, you can make elements (e.g., stickers, titles, texts, etc.) track any moving object.
During my Movavi Video Editor review, the feature was quite basic. However, it effectively achieved its intended purpose. Nevertheless, I would appreciate adding more advanced Motion tracking options in the future.
AI Noise Removal
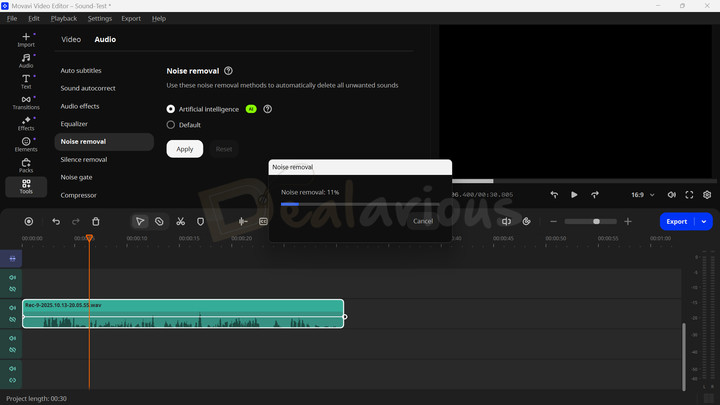
Thanks to Artificial intelligence, the Noise Removal option effectively removes background noise present in your audio clips. During my test, the feature worked impressively well, leaving no space for unpleasant noise. However, using too much of this can distort the audio clip.
AI Background removal
Background removal uses artificial intelligence technology to remove the background from videos smartly. You can choose between Quick and precise removal options. In my experience, the Background Removal feature did a great job removing the background from a moving subject in a handheld shot. However, I noticed some rough edges at times. Hence, I suggest you use the feature on a full static video for better accuracy and polish.
AI Auto subtitles
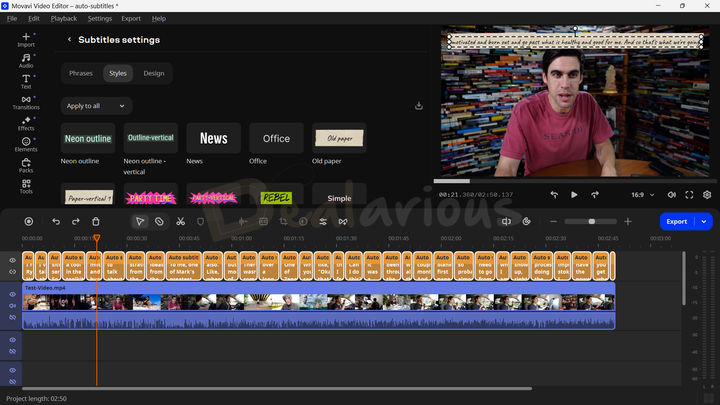
With the help of AI, Movavi automatically generates subtitles for your videos. This feature is extremely handy, as it eliminates the need for manual typing. Once the subtitles are generated, you can also manually design them or pick from 30+ design styles to fit your needs. The design spectrum includes multiple templates of choice, fonts, font sizes, colors, backgrounds, positioning of the text, etc.
During my Movavi Video Editor review, I found the feature to be extremely efficient. The feature took around 3 minutes 20 seconds to generate subtitles for a 2-minute 50-second video clip, and the result was fairly accurate. You can also edit the texts if required. The latest version also includes translating your subtitles into English. However, during my test, the translation feature did not provide accurate results.
Movavi Video Editor: Interface & Workflow
User Interface Overview
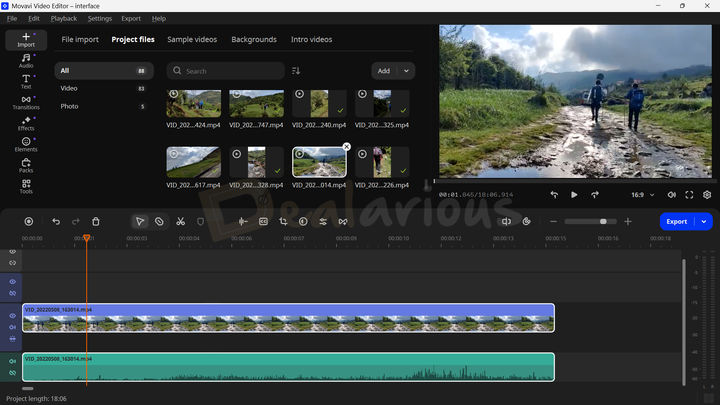
Movavi always believes in making complex tasks easy for its users through its simplified software. Hence, the same applies to the video editor.
Movavi Video Editor 26 has an easy-to-use interface. All the tools are pretty much based on 'What You See is What You Get' or the WYSIWYG principle. Upon opening the editor, you can locate all the main tools on the left side panel. From here, you can add effects, transitions, animations, stickers, and access other advanced tools.
The timeline is placed at the bottom of the screen & a live preview player is on the right. You can scrub the video for minute changes as you edit them.
The learning curve should be minimal for all users, even those with minimal knowledge or no background in video editing techniques. The Video Editor's background is thoughtfully kept black, reducing eye strain when working with videos for long hours.
Quick Start and Timeline Editing
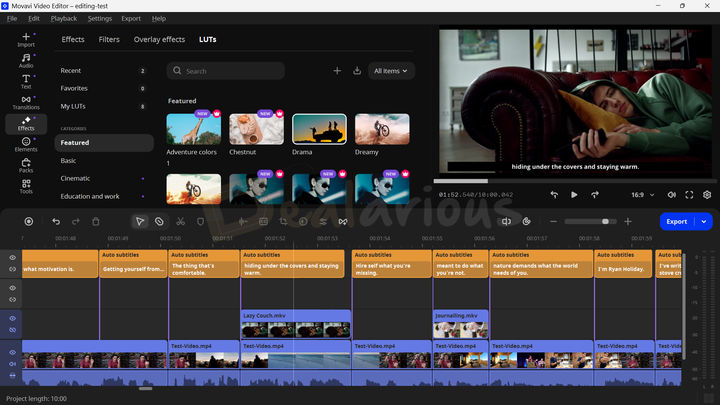
You can easily add media files to Movavi Video Editor by going to File import or by dragging and dropping the files into the File import window. Besides using your files, you can also use built-in media files like sample video clips, Intro videos, and background images.
The Audio tab allows you to add audio tracks, background music, and sound effects to your videos. Movavi Video Editor includes numerous intro videos, which you can edit to create your own versions.
You also get the option to Record Video through the front-facing camera or any other connected device. For audio recording, you can use the Record Audio option.
The Preferences option, found under the Settings section, lets you control your app further. It has four tabs through which you can fine-tune the app: General, Files, Sharing, and Acceleration. You can adjust different settings according to your requirements.
Note: The Slideshow Wizard, which was previously found in the File Import window, is now Movavi Slideshow Maker, sold separately.
Timeline Editing
Organizing all your clips on the timeline is also very easy. You can drag and drop the clips on the timeline as you wish. By default, all the clips are arranged in line with the sequence you want to add.
Movavi Video Editor 2026 features an intuitive timeline, simplifying clip organization and streamlining the editing process. You get 16 key video editing tools in the toolbar section for quick access. The Silence removal tool is the new inclusion in the toolbar. Besides that, you get other handy tools like Record, Undo, Redo, Delete, Selection, Blade, Split, Marker, Auto subtitles, etc. The Export option is thoughtfully placed on the right, which I found very convenient.
You can preview your project in the built-in player located on the right side of the window. This player has all the options you need to play, pause, forward, or back the video you are working on.
There is a unique control with the Preview Window to detach the window from the editor. I love this feature as I have a multi-monitor setup that allows me to edit on one monitor and preview the timeline in full screen on the other.
Please note that there is also an option to increase the preview quality. I recommend it only if you have a powerful computer, as you might notice lag with the preview.
Managing Projects
When you start working in Movavi Video Editor, all your changes are saved under a 'Project.' All the video projects are saved in the .mepj format on your device. You can open it anytime to process it in the Movavi Video Editor. You can save your project by pressing the Ctrl+S shortcut key.
Sometimes, you might want to combine some of your projects into one. To do this, go to the 'File' menu and select 'Append project.' A window will open, find, and select the project to append to the current project. However, note that the appended project files are always added to the end of the current project files.
One fantastic option when working with multiple devices is saving a Portable Project. When you save a Portable Project, Movavi Video Editor helps you automatically save all media files that the project contains into a folder that you can carry to another device. It is specifically helpful if you have the Video Editor on more than one PC / Mac and wish to edit on them when you have them with you. For example, you can start your edit on your home laptop and resume the editing at the office.
Workflow Impression
Editing on Movavi Video Editor was smooth. While I faced some occasional lag due to my low-spec system and high-quality video inputs, the overall editing experience was impressive. Applying transitions, effects, and color corrections was all easy. Depending on the selected media, I was able to tweak different areas, such as volume, playback speed, applying fade-in or out duration, opacity, blending options, etc, from the Clip Properties tab.
The automation of advanced features (E.g., scene detection and Silence removal) and AI features (Subtitle generator and Noise Removal) sped up the editing task further. Overall, the experience was highly satisfying.
Tip: Want to level up your editing skills? Check our video editing tips and tricks before you start your journey.
Movavi Effects Store
Apart from all the pre-installed effects and stickers in the app, you can add more. There is a huge collection of amazing effects, transitions & stickers on the Movavi Effects Store. You can browse the collection online and purchase the ones you like for your project.
Note: In the latest update, Movavi has introduced a variety of fresh effects to their store. These effects can be exported with your video, but this is only possible if you subscribe to the Movavi Effects Store.
Movavi Video Editor: Exporting
Once you've finished editing your videos, you can export them using the Export Option. From here, you can either choose to export the full video or a specific segment. Also, you can export videos specific to devices like Android devices, iOS devices, or even TVs.
Apart from videos, you can also export audio files using the most commonly used audio codecs. You can also upload your videos directly to different online platforms like YouTube, Vimeo, Google Drive, or TikTok.
There is no support for H.265 encoding. Hence, you have to stick to other popular encodings like H.264.
Movavi Video Editor Performance
For my Movavi Video Editor review, I used 2K and 720P sample files to test the application's stability. My system specifications are:
- Processor - AMD Ryzen 5 3500U, 2100 Mhz, 4 Core(s), 8 Logical Processor(s)
- RAM - 12.0 GB
- OS - Windows 11 Home Single Language
- Graphics - AMD Radeon Vega 8 (Integrated)
Idle State Resource Usage
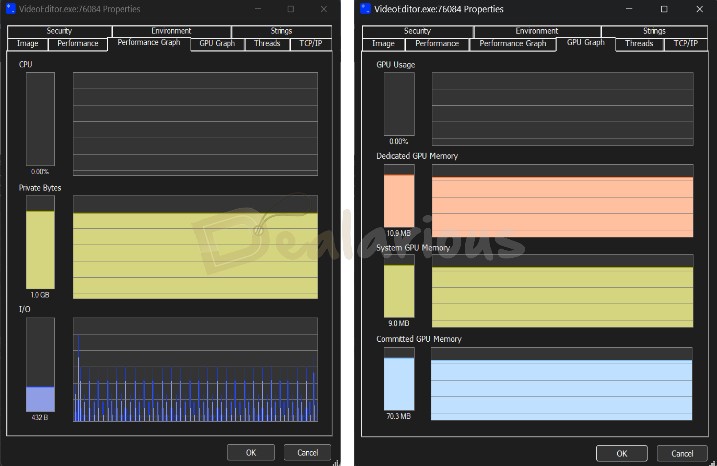
The program in the idle state didn't use my computer's CPU and GPU resources, but it did use 1GB of RAM.
During the real efficiency test for Movavi Video Editor, I added 15 minutes of 2K video, which I trimmed down to 10 minutes, and a few clips in 720P resolution.
Result
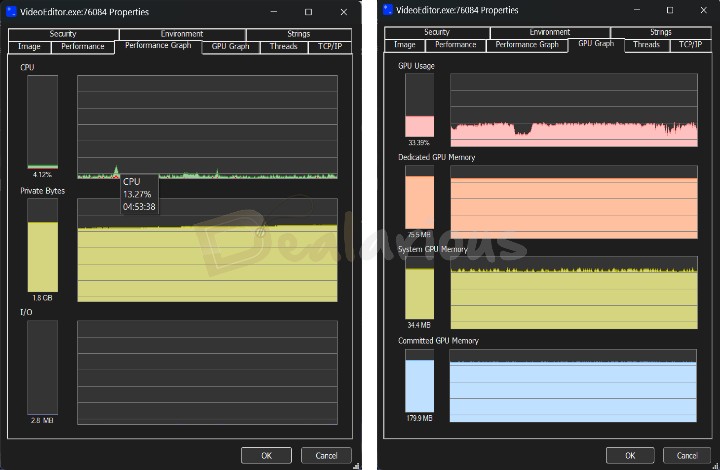
Export Settings
Video Length: 10 Mins (Trimmed Down)
Format: MP4
Quality: High
Resolution: 1920X1080
Frame Rate: 24 FPS
Size: 990MB
Movavi Video Editor took around 20 minutes to finish the export, and the performance test results were quite impressive. Contrary to my past experience with the program, the CPU and RAM consumption was lower in the latest tests (13.27% of CPU and 1.8 GB RAM). The program maintained a constant of 75.5 MB of shared GPU memory consumption during the export.
Note: My tests just show the basic performance for editing. As you add more elements to your videos, they will use more resources and take longer to export.
Conclusion
Throughout the entire testing process, my device performed smoothly without experiencing any lags, which is a positive outcome considering the huge size of files I was editing.
Movavi Video Editor Review: Overall Experience
Movavi Video Editor is a highly efficient video editing tool for a diverse range of users. As a fellow video editing enthusiast, I liked some of its features.
What I Like
- The sleek design and user-friendly interface make navigation within the application seamless. Even individuals with minimal experience in video editing can quickly grasp the fundamentals.
- The detachable preview window is notably convenient for users with a multi-window setup, enhancing the overall video editing experience.
- One of the standout features I found in Movavi Video Editor is that the program allows users to export videos in 4K resolution, a feature many standard video editing applications lack.
- The latest inclusion of the Auto subtitles feature has significantly improved Movavi's editing efficiency by eliminating the need for manual subtitle typing, which was a time-consuming task.
What I Dislike
- Movavi does not currently support H.265 videos. Incorporating this function in future updates would significantly enhance the editing process, allowing for crisper video outputs.
- The latest subtitle translation feature provided less than satisfactory results during my test. They were often inaccurate, leaving me with unusable results. As this feature is still new, it can be understood. However, I hope to see improvements with the upcoming updates.
How good is the Software Support?
Movavi Video Editor, like all other Movavi products, offers good software support. You can find the User manual through the 'Help' tab on the main menu. This manual has a detailed description of every tool and function available for Movavi Video Editor.
The Support Center has a dedicated resource section that includes FAQs, Lost Key Recovery, Software Upgrades, How-Tos, Video Guides, and more.
Moreover, you can also access the Live Chat and email support team with your queries. The live chat support team replies during their active hours, while the mail support team usually responds within an hour. The support agents are patient and detailed when resolving queries.
Compared with other Video Editing Programs
In this Movavi Video Editor review, I have now reached a point where I can quickly compare with other popular and stable video editors. So, let's dig in.
Is Movavi Video Editor Better than Filmora?
Both video editors are easy to use and support faster processing of large HD Videos. Movavi Video Editor is much more beginner-friendly and has advanced features. Moreover, it is more affordable than Wondershare Filmora.
Compared to Movavi Video Editor, Filmora offers the Screen capture feature that is missing in Movavi Video Editor. For screen capturing, Movavi has a separate program named Movavi Screen Recorder. Also, Filmora offers multiple presets for the split-screen effect compared to Movavi. Last but not least, Filmora supports the HEVC(H.265) format, whereas Movavi doesn't. Learn more in this Wondershare Filmora review.
Is Movavi Video Editor Better than AVS Video Editor?
Both have many features in common, like Chroma key, Video stabilization, and support for 4K video editing. AVS Video Editor includes all the basic video editing functions. Movavi Video Editor has much more advanced tools and a short learning curve.
AVS Video Editor is part of the AVS4YOU subscription package, and you can get it at a budget-friendly price using AVS4YOU coupons. Find out more about the features included in this AVS4YOU Review.
Also, AVS Video Editor is available for Windows PCs only, and Movavi Video Editor is available for Windows and Mac.
Movavi Video Editor should not be compared to high-budget professional tools like Adobe Premiere Pro, HitFilm Pro, etc. They are not easy to learn and are unsuitable for general home or budget-conscious users.
Frequently Asked Questions
Is Movavi Video Editor Safe?
Yes. Movavi Video Editor is completely safe to use.
As per the official Movavi website, Movavi software has no potentially harmful malware in its files. Also, they claim that they do not compromise your privacy or collect any associated personal details other than those required for licensing.
Is Movavi Video Editor free to use?
No. You can try the free version of Movavi Video Editor for 7 days with restrictions. After the trial ends, you will have to activate the subscription.
Conclusion: Is it Worth Your Money?
To sum up, this video editor app is definitely worth your money. It is super easy to use, and the advanced options for creating a perfect video and prompt support make it a top choice among other video editing software.
Changelog
Sourojit is the Executive Editor at Dealarious and has been writing reviews, tips, and how-tos since 2008. A Computer Science Engineer by degree, he enjoys turning complex tech into simple, useful insights.
Outside of work, he’s a DIY enthusiast who enjoys gardening, long drives, and building custom PCs, often experimenting with water-cooled setups. Over the years, he has played the roles of reviewer, storyteller, experimenter, and teacher.