Internet Download Manager is the best available download manager in the market today. By features, it beats any download manager by unmeasurable margins. However, here are a lot of small features that are not included in the main feature list either. In this article, we pick up such small features that make your download experience much better.
Don't have IDM Pro yet? Get it at $20.80 for Limited Time.

1. Unattended Downloading / Scheduling in IDM
Do you download many files? If yes, then the hassle to add all the files to the manager and downloading them one by one is already known to you. IDM makes this task easy for you. All you have to do is tell it when to do so. The scheduler is the most important and useful feature that makes IDM an excellent download manager that the rest.

To enter the scheduler Menu, click on the Scheduler icon present on IDM toolbar. On the menu, you see two tabs. One is for creating the time rules for the download start and finish. The other one is to control the number of files that you can download simultaneously. You can create your schedules and name them accordingly.
a) When the dialog box appears while adding the download, select “Download Later” and add directly to the queue.
b) Right-click on file from download list and select Move To followed by the name of the queue.
IDM can automatically start downloads in a queue at a specified time and days. Also, IDM can automatically disconnect the internet connection and shut down your PC once the status of the download queue is complete.
- It is helpful if you want to download after working hours so that it doesn’t affect browsing speed.
- You can take benefit of Happy Hours or Free Download time (if any) by ISP.
- You can schedule lower Priority files for later downloading.
2. Make 100% Utilization of Bandwidth
With IDM, you can use the complete bandwidth of your internet connection to push the stability of download speed to the furthest extent. Yes, now you do not have to worry about other applications that leech the bandwidth and leave your downloads with reduced speed. The latest version of IDM supports a maximum of 32 connections made to the same server to download a single file.

With this setting you can utilize the available bandwidth efficiently. Hence, a great benefit to people with a vast shared network. How to do so? Go to Options >> Connection. Select the type of your connection and then select the desired number.
Number of connections made depends totally on the download server. If the download server does not support multiple connections, only 1 connection will be made.
Caution: Selecting 32 connections may disrupt internet speed of other users in the same network. Also, note that there might be performance issues on lower end systems as the number of connections is increased. Hence, if you encounter such things, just lower down the connections.
3. Virus Scan after Download
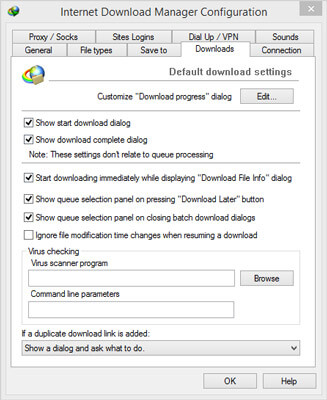
This is an issue that troubles all of us. So why not end it before it can even begin. Upon the completion of the download, IDM can automatically initiate a scan of the downloaded files with Antivirus Program installed on your System.
This is the safest way to handle external files from the web and ensure that your system is safe from all threats. Go to Options-> Downloads then find the “Virus Checking” section. Now all you have to do is browse and select the .exe file of your antivirus application.
Get Bitdefender Total Security @ 80% OFF
4. Configuring IDM to use Dial Up Connection
IDM can automatically connect to the internet using your Dial-Up or VPN service. Almost every time we skip this setting as the requirement of internet access is done by Windows default functionality or an application interface provided by your ISP.
To add your Dial-Up settings go to Options -> Dial Up/VPN. Do remember to check on Save Password.
If you have a direct internet connection then Dial Up is not applicable for you but still, you can configure it for a VPN if you are already using it.
Benefits
- A drop in the internet connection will not interrupt your downloads. IDM will auto reconnect the connection and resume the downloads. Hence, the process is automatic.
- Configuring IDM to use a VPN connection allows it to download files from locations which are blocked by your ISP.
- It has a major role in Scheduling downloads. We will discuss this part later on.
5. Change IDM’s Temporary Folder

Changing the default Temporary Folder of IDM is a must if you have less space on C:\ Drive. Advanced download managers like IDM download files in many chunks and they are initially stored in the temp folder. Once the download is complete, the fragments are combined to form the original file at the selected download location. Once the final file is created, IDM deletes the temporary files.
So, if you are trying to download a big file of say 15 GB in D drive which has ample of space but your C Drive has lesser than that, you will get an error message and download will not be possible. The Same concept is also applicable for smaller but cumulative and simultaneously downloaded files.
Go to Options >> Save to and find Temporary Directory section at the bottom, then select your desired location. Also, you can change the default download location from this panel.
Please note that you should not select a location on different hard drives. It may result in slower compilation upon download completion. This might happen due to different hard drive transfer speeds.
6. Limiting Download Speed

If you have an urgent task like browsing the internet while IDM is downloading files for you, its bit natural to get slower browsing speed.
If you do not want to stop the download completely, restricting the speed is the best choice at hand. This method can be used permanently on your downloads, but the best usage scenario is for urgent tasks. To restrict the download speed of an individual file, open its Progress Window and select the option to limit speed. You have the choice to choose a limiting speed as desired.
7. Download from Premium Websites
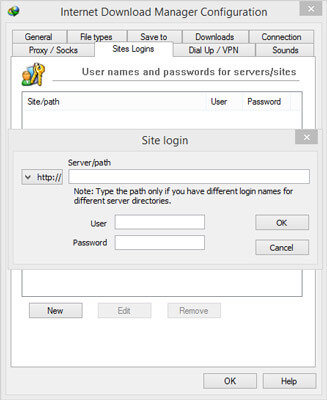
This option is not of much help these days to the majority, but it still is worth a mention. If you use premium file servers, you can use their credential in IDM, and it can directly download files from the servers. There is no need for you to use the web browser for the same.
This feature is a great relief while bulk downloading from premium file servers. Go to Options >> Site Logins. Now you can add the site address and your credentials. That’s it. This feature can be used for multiple purposes. Any site that requires your login details for file download can be added here.
8. Get Copied links in Windows in IDM Download List

More than a setting it is a feature already present in IDM. All you need to do is copy a link that you want to download. This link can be present anywhere in Windows be it a browser or a text file. All you need to do is that after copying the link, open IDM. Now click on “Add URL,” your link will be ready there. You also have the option to specify login credentials if required to download the files.
9. Automatically Download Copied Links in Windows
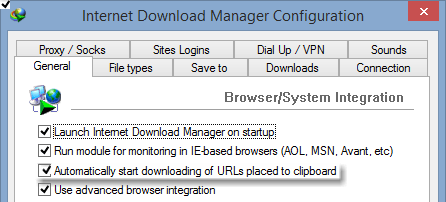
This option allows you to just copy any link in windows and automatically let IDM download the same. Well, doing so is convenient as it saves time. Go to Options >> General.
Now check the option “Automatically start downloading of URLs Placed in Clipboard“.
10. Prevent Downloading Files from Certain Websites
When IDM is installed, it overtakes all downloads from the browsers. This might be a problem when you are trying to download from a site that does not allow download managers.
How to stop IDM from intercepting these downloads?
a) Use key combination while clicking on download link. By default, you can hold the ALT key and click on the link to let your browser download the file. If any other application takes the key, you can also make combinations like ALT+SHIFT. You can make all these changes in Options-> General. Search for the option Customize Keys to prevent or force downloading with IDM.
b) Adding Known Sites to Black List is another option that you can have. This case is only handy when such sites are already known to you. Go to Options >> File Types. Now add known sites to the exception list.
11. Organizing & Managing Downloads
Sorting Downloaded Files
You can sort and arrange downloaded files in any order and by any criteria that you like.
You can apply sorting from menu option View >> Arrange Files. Another way to do this is just by clicking the Heading tabs in the Download list.
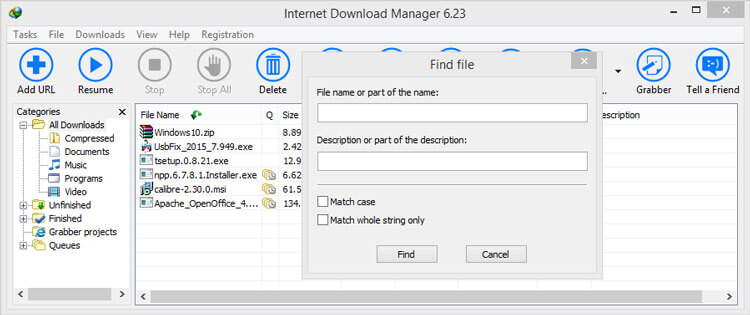
Searching Downloaded Files
If you download a lot of files files, searching the one might be an issue at a later stage. IDM provides a simple solution to find your files. With IDM on the main screen, press CTRL+F. Hence, the search console comes up.
12. Changing Look & Feel of IDM
With Windows 10 and Windows 11, we have a Modern UI. However, IDM probably is not the best software if you are looking for a modern interface.
In this case, features always shadow the basic IDM interface. That is what we want. Still, it is always better to try something new visually. Are you also bored with the interface? Then this tip is for you.
To get access to new icon packs, go to View-> Toolbar-> Look for new Toolbars. This option will redirect you to their web page consisting of all the available icon packs. Follow the instructions below to apply the one you like.
- Download the icon pack zip file.
- Navigate to IDM installation location. By default it is C:\Program Files\Internet Download Manager, if you are using 64 Bit Windows, it should be C:\Program Files (x86)\Internet Download Manager.
- Once you are in the location above, search for Toolbar Folder. Now you have to extract the contents of the downloaded icon pack zip file here.
- Restart IDM.
- Open IDM again and navigate to View-> Toolbar-> Look for new Toolbars again. This time you will see the new Icon Pack name on the list. Just select it, and the change takes place immediately.
Conclusion
These features and tips will help every IDM user. However, there are a lot more functionality that you can tweak as per your usage habits. Found a tweak of your own? Do share it with us. Also, remember to check out the best Internet Download Manager offer at Dealarious Store, if you haven’t already.
Sourojit is the Executive Editor at Dealarious and has been writing reviews, tips, and how-tos since 2008. A Computer Science Engineer by degree, he enjoys turning complex tech into simple, useful insights.
Outside of work, he’s a DIY enthusiast who enjoys gardening, long drives, and building custom PCs, often experimenting with water-cooled setups. Over the years, he has played the roles of reviewer, storyteller, experimenter, and teacher.
How do I set Save As default to yes in order to keep the given filename without having to click yes repeatedly in the Save As dialog boxes that pop up after adding files to the download queue list? Clicking on yes manually is quite tedious.
Hello Terry,
Currently IDM does not have such functionality. Maybe they will add it in the future.
Please make sure to close idm completely from the tray then start it .
Great post!!!
Hi Sourojit,
it’s really a nice post… I have a question related to idm, how to install IDM plugin??
I am using chrome browser.
its really awesome thanks