Are you using video content to communicate with your audience? Are you effectively looking for effective tools that can help you make more engaging, professional-looking, and informative videos?
Good-quality production is no longer reserved for professionals; even amateurs can now make awesome video footage with effective tools.
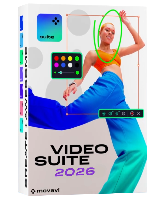
Today, we take a look at the Movavi Video Suite review. This tool can make your video creation & editing journey very easy. Movavi has just launched its latest Video Suite 2026. Since 2004, Movavi has created powerful software for content creators to create, edit, share & enhance their content.

Movavi Video Suite 2026: Quick Summary
Pros
- Extremely easy to use
- A lot of premium features
- Inbuilt training module
- 4K Rendering
Cons
- It can get a little slow when rendering heavy files
- It does not support H.265
overall
USD 50.95
Supported Platforms: Windows, OSX
Interface
5/5
Features
5/5
Performance
5/5
Support
4/5
Overview
The Movavi Video Suite 2026 is an all-in-one tool. It is a video maker that can be used as an editor, converter, screen recorder, and much more. Hence, it perfectly complements remote work and distance education.
Key Features
Video
- Editor
- Converter
- Computer screen recorder
- Capture from VHS, Cameras & TV
- Watch video
- AI Upscaling
Audio
- Sound recorder
- Music Player
Photo
- Convert Images
- Slideshow Video Maker (Separate purchase)
- Photo Editor (Separate purchase)
Data
- Import AVCHD
- Burn Disc
- Burn Image to Disc
- Copy Disc to Disc
- Copy Disc to Hard Drive
You can read my in-depth Movavi Video Editor Review to learn more about the video editing features.
Download & Installation
Before downloading Movavi Video Suite 2026, it is worth checking the system requirements to ensure smooth performance.
The download and installation are pretty straightforward. From the official Movavi website, download the installation file. Once downloaded, double-click on it to install it. It takes under a minute to install. Also, it is compatible with the 64-bit version of Windows 10/11.
For older Windows systems, Movavi's legacy versions are a good choice.
In my test, the full installation took up about 437 MB of disk space.
Pricing Structure
On the official website, you will find two main purchase options:
1-Year Plan(1 PC): USD 94.95
Lifetime license (1 PC): USD 124.95
You can also try the 7-day free trial, with access to all features; however, there are some trial limitations.
You can also check out Movavi Video Suite Coupons and get great discounts on the lifetime license.
Movavi Video Suite 2026: What's New?
The upgraded version of Movavi Video Suite 2026 has the following upgrades from its previous versions.
Features | Video Suite 2023 | Video Suite 2024 | Video Suite 2025 | Video Suite 2026 |
|---|---|---|---|---|
Interface with Dark & Light Themes | Yes | Yes | Yes | Yes |
Live Chat Support | Yes (For Paid Users) | Yes (For Paid Users) | Yes | Yes (Limited Hours) |
LUT-Effects | Yes | Yes | Yes | Yes |
Movavi Account | Yes | Yes | Yes | Yes |
AI Background Removal | Yes | Yes | Yes | Yes |
AI Noise Removal | Yes | Yes | Yes | Yes |
AI Upscaling | Yes (8K) | Yes (8K) | Yes (8K) | Yes (8K) |
AI Motion tracking | No | Yes | Yes | Yes |
Blending Modes | No | Yes | Yes | Yes |
Blade Tool | No | Yes | Yes | Yes |
Auto Subtitles | No | No | Yes | Yes |
Silence Removal Tool | No | No | No | Yes |
Subtitle Translation into English | No | No | No | Yes |
Apart from these, the feature list remains the same as in the 2025 version.
Movavi Video Suite: User Interface Review
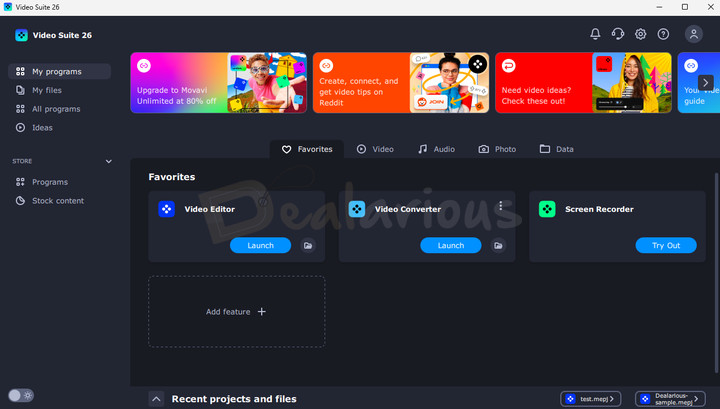
Movavi's applications are known for their brilliant beginner-friendly user interface, and Movavi Video Suite is no different. The interface of Movavi Video Suite 2026 is the same as the previous version, with dark and light themes.
When you first launch Movavi Video Suite 2026, it asks for your interests, which we must fill out. Based on those interests, it will give personalized recommendations on programs, stock content, and online courses that will be useful in the long run.
The default view is for the Favorite Apps screen under My programs. The favorites section holds all your favorite programs from within the Suite. You can add a new feature from the Video, Audio, Photo, and Data sections.
On the left side of the home screen, you will find all the essential modules vertically aligned.
- My programs: This section has five tabs: Favorites, Video, Audio, Photo, and Data.
- My files: Here, all the assets you have worked on are categorized in their respective formats. Images, audio, and videos are sorted by category for easy later access if required. You can also add new files here.
- All programs: This tab is organized into two sections - Trial Versions and Installed programs. It also displays updates regarding Movavi apps when a new version is available.
- Ideas (New): This tab in Movavi Video Suite 2026 gives you project ideas and tips to help you get started with video editing quickly.
- Store: The Store section includes Programs and Stock Content.
The top section highlights the latest news around video production, helpful tutorials, and interesting articles centered around content creation. The bottom section holds the list of your frequent projects to access whenever you want.
Movavi Video Suite 2026 Review: Functionality
Multi-Layered Timeline
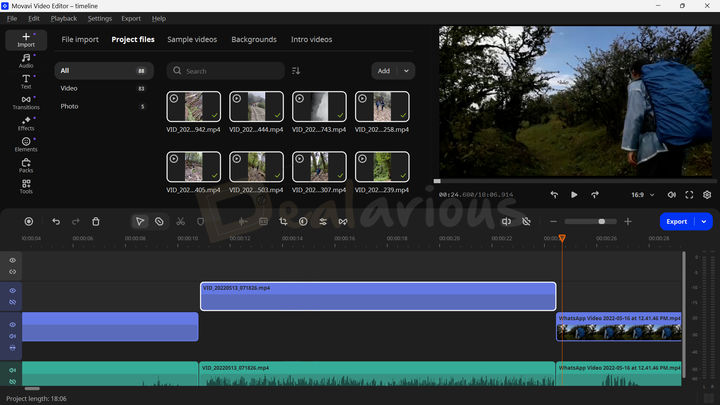
There is a timeline on the bottom where you can see and edit the clips' timelines, including audio, video, and more. The timeline is divided into three parts:
- Titles track
- Videos track
- Audio track
It is as easy as drag and drop. To edit something, drag it and drop it into the respective timeline track.
Note: Similar to other professional video editing applications, you can add multiple titles, videos, and audio tracks to the timeline. The latest update offers a redesigned timeline for a more efficient video editing process, along with the addition of a few quick tool features, such as a Blade tool that makes it easier to make precise cuts within your video scenes, Auto subtitles to quickly generate subtitles for your video, turning on and off snapping, and enabling/disabling preview on hover.
Assets Management
You can also modify individual assets through the Clip properties tab to adjust their specific properties like Volume, Speed, and more for audio clips. Similarly, you can adjust effects, blending modes, and more for videos. There is an easy option to clip excess assets and delete them with one click.
You can also add filters, transitions between videos for smooth movements, titles for text overlays, and stickers for added value. All these options come with presets you can easily access through the Presets tab.
While the previous version already included the Auto Subtitles feature, the 2026 version adds several improvements, including a Silence Removal tool, new subtitle styles, and the ability to automatically translate subtitles into English.
The More Tools tab has advanced video and audio editing options.
Video Editor options
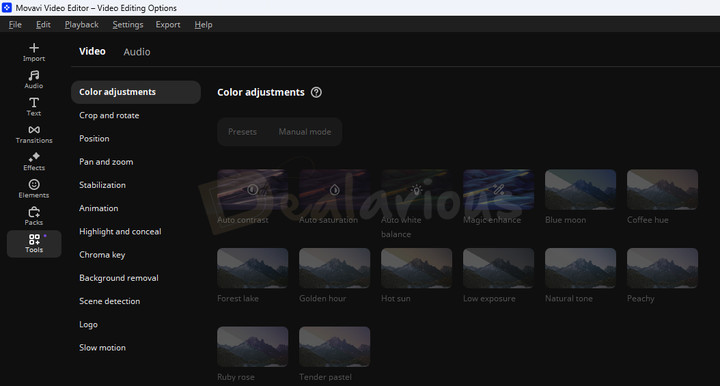
- Color adjustments
- Crop & Rotate
- Position
- Pan & Zoom
- Stabilization
- Animation
- Highlight & Conceal
- Chroma Key
- Background removal
- Scene detection
- Logo
- Slow Motion
Audio Editing options
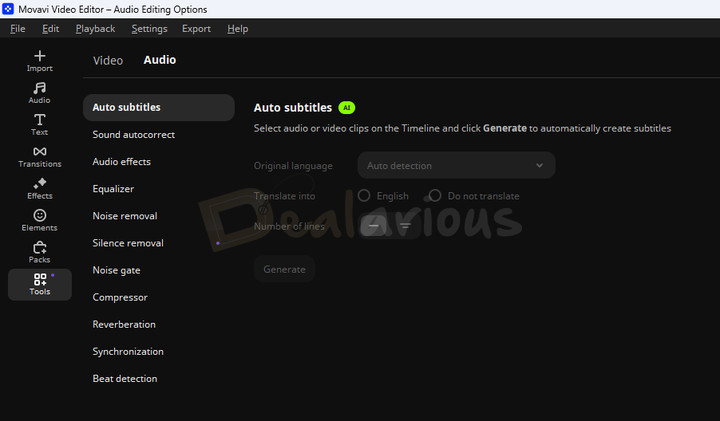
- Auto subtitles
- Sound autocorrect
- Noise gate
- Compressor
- Equalizer
- Noise removal
- Silence Removal
- Synchronization
- Audio effects
- Reverberation
- Beat Detection
AI-based features
Movavi has introduced a few AI-based features in Movavi Video Editor to facilitate the easy, neat, and quality processing of your video content.
AI Auto subtitles
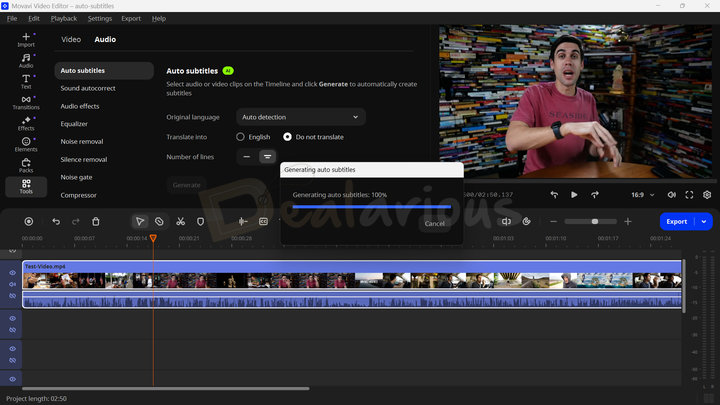
With the help of AI, Movavi now helps you generate automatic subtitles for your video. This feature significantly streamlines the process of adding subtitles to your videos by minimizing the need for manual subtitle typing, which can be both time-consuming and tedious. It supports 13 different languages and efficiently creates subtitles that are synced with your video. Once the subtitles are generated, you can further customize them by editing the text, changing the font, adjusting the size, color, position, etc.
The completion of the process largely depends on the video's length and how much dialogue it contains. On my end, it took 3 minutes and 20 seconds to generate subtitles for my 2 minutes and 50 seconds of dialogue-based content.
In the 2026 version, new subtitle styles have been added. You can also translate auto-subtitles into English.
Silence removal
Movavi's new Silence Removal tool is a handy addition that automatically detects and cuts out long pauses in your audio or video, making editing faster. For more control, you can switch to manual mode and tweak different options like volume threshold, duration, delay, etc.
AI Background removal
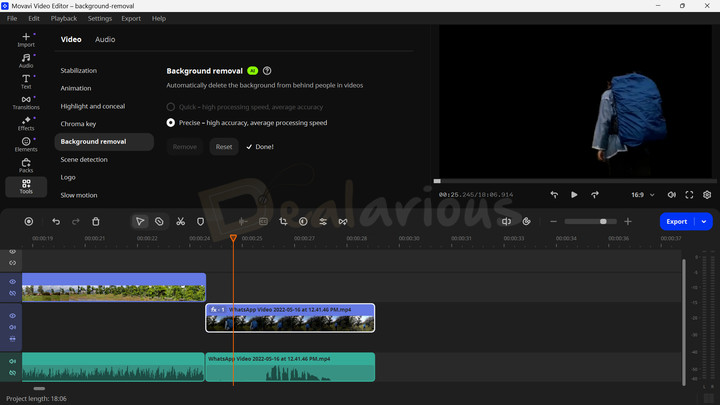
With the AI Background removal feature, you can remove clean backgrounds from a video and replace them with any background you like. In my review, it did a pretty impressive job.
Tip: For accurate results, make sure the main subject is clearly visible in the foreground. If the footage contains too many objects, the program might struggle to create satisfactory results.
AI Motion Tracking
With the AI Motion Tracking feature, you can make elements such as images, stickers, and title texts track any subject from the video.
This feature works only with inbuilt objects.
AI Noise removal
With this feature, you can minimize all the background noises from videos and listen to the clear sounds of the subject. This feature is most effective when editing a Vlog, and so far, I have no complaints. It worked aptly during my review by minimizing the most cluttered background noises.
Exporting
After all the edits are done, you can export the video to your desired format to save it to your system. However, with the export button at the top of the toolbar, you also have the option to directly upload your videos to YouTube, Google Drive, TikTok, or Vimeo at the click of a button.
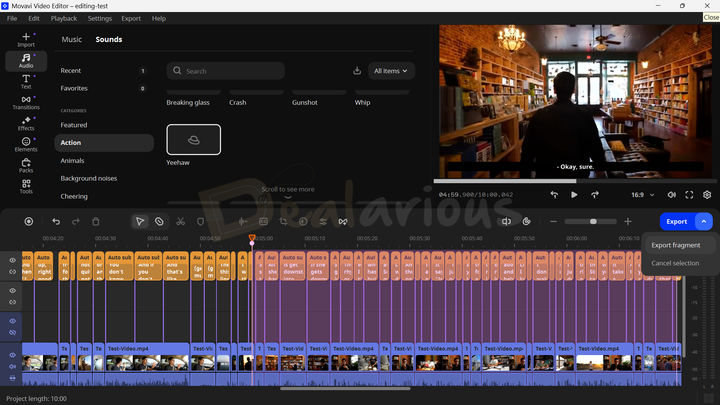
Note: What I found impressive about the export section in Movavi Video Editor is that the program allows you to export specific fragments of your video directly from the timeline. This inclusion is particularly handy when you don't want to export the entire video but just a specific scene or segment that you find interesting.
Movavi Video Suite: Video Section Features
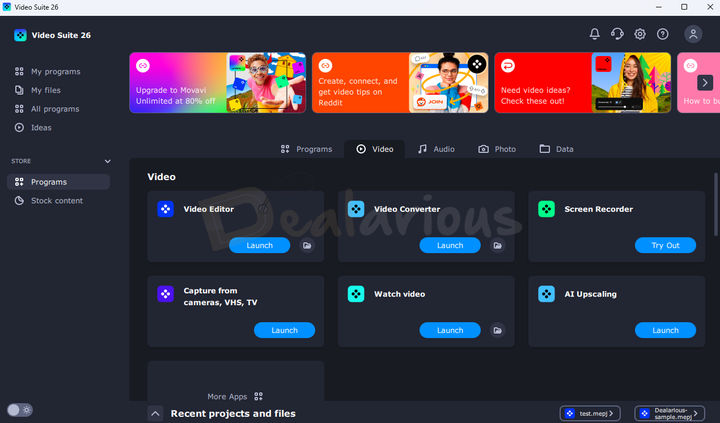
Video Editor
The Video Editor feature in Movavi Video Suite 2026 offers simple ways to create engaging video content. Once you click the Launch button, a new window will open. From here, you can start editing your videos.
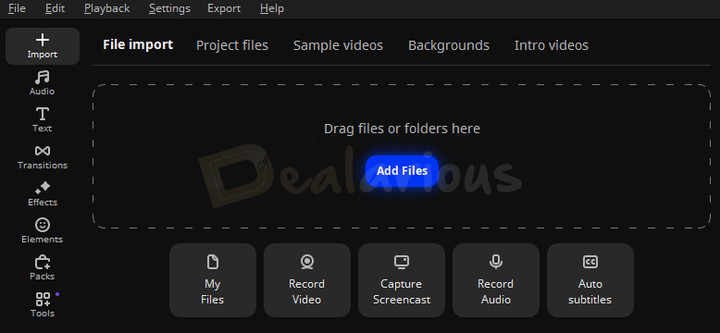
You get access to all the tools required to clip, mask, and insert audio and text into your videos in the editor. To get started with your video editing journey, you must import the videos through the 'Add Files' option, which you can find under the 'File Import' tab. Also, all other media forms you import externally are placed under the Project files for easy accessibility.
Once you import your required files, you can edit by dragging and dropping the audio and video files into their preferred timeline track.
However, I felt a few things could be improved to make the editing process more convenient.
- The program doesn't let you pre-trim the clips before putting them into the timeline. However, pressing Ctrl+B allows you to split a certain clip section inside the timeline.
- The next feature was the absence of some prominent hotkeys such as In(I) and Out(O). However, you can find some hotkeys like Ctrl+O ( Add media files), Ctrl+F (Open project), Ctrl+R (Record Audio), Ctrl+D (Clone Clip), and others in the help menu.
These features would have given Movavi some added advantage over its competitors and a little enhanced user experience.
Video Enhancement
Enhancing Videos
Video enhancement is the part where all the magic happens. Once you are done with the formation of the clips on the timeline, you can start enhancing videos by adding effects and transitions. Movavi has a bundle of effects, transitions, and LUTs collection that you can purchase from the Movavi Effects Store. However, the inbuilt collections are enough for amateur and intermediate creators.
Additionally, the latest version includes 40+ adjustable effects, giving you the flexibility to fine-tune your clips that match your taste.
Transitions
You can apply transitions to any clip to add cool graphical movement to your videos. You can even set the transitional duration, a handy feature for amateur users. You can also preview the transitional effect in action in the preview screen and add multiple effects as required.
Note: One of the standout aspects of Movavi Video Editor's transition feature is that you have manual control over it. It means that you can customize the transition effect and choose how long each transition lasts, whether it affects just one clip or more, including Pan and Zoom effects. You can also change the photo clip duration and fill transitions in three different ways: trimming content, freezing frames, and slow motion.
Filters, Overlays, and LUTs
You will find all three modules under the Effects panel. Movavi has many useful filters for multiple occasions. However, there are only a few inbuilt overlay effects and LUTs. However, Movavi balances this gap by providing the flexibility to import LUT effects in .cube format and apply them to your clips. You can also adjust the LUT intensity to suit your preference.
Video Stabilization
Applying video stabilization mode over a clip, which is available in the More Tools section, can minimize the shaky effect in your videos.
The feature worked quite well during my review. The feature stabilized my minimal wobbly video so much that I didn't notice any shaky movements. However, the process works modestly, processing a major oscillated video footage.
Chroma key
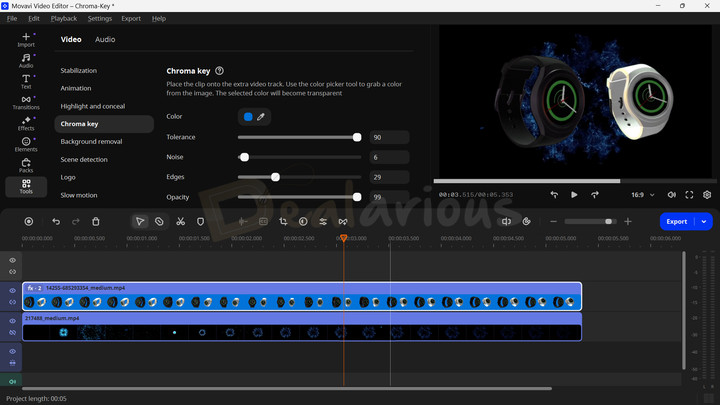
The Chroma key feature, located under the More Tools section, lets you remove the green screen background and add stunning special effects to your videos. It also allows manual controls for Color, Tolerance, Noise, Edges, and Opacity.
Speed
You can adjust the speed of your video clip by navigating to the Clip properties of the footage. You can increase your clip speed upto 100X, which is ideal for time-lapse video. You can even apply the reversal effect. Finally, you can navigate to More Tools-->Slow motion and decrease your video footage speed to apply the Slow motion effect.
Video Converter
This feature converts video to different formats, as well as audio and images to other supported formats. It is the universal "Converter" available for all formats in the Video Suite. Movavi Video Suite integrates Movavi Video Converter. If you wish to look at other options, check our WonderFox HD Video Converter Factory Pro review.
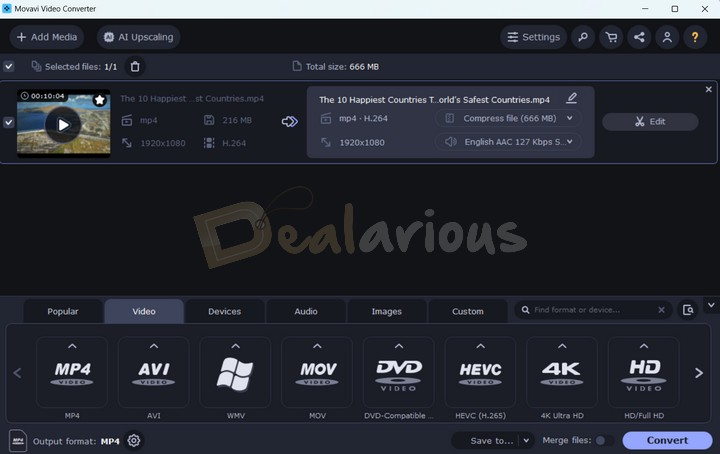
The best feature here is an option to plug in your portable devices, such as a smartphone, tablet, or iPad, and Movavi will auto-detect the best-supported format for that device.
The conversion function is also easy to use. You can drag and drop any media file into the window and choose the available output format for that file. You can convert videos, audio, images, and even select devices. There is also an additional option of converting a DVD.
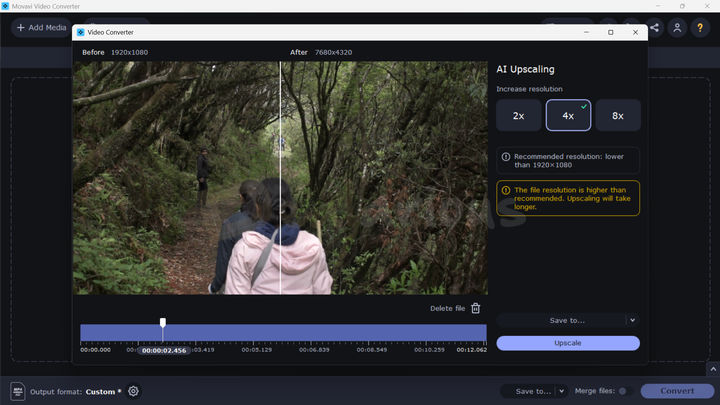
Movavi Video Converter also includes an improved AI upscaling feature. It lets you change the video resolution to improve the video quality.
Screen Recorder
The Screen Recorder is a neat and simple tool for basic and advanced users. Once you launch the tool, it appears on the right side of your screen. You have options to capture your screen or video record it.
Recording your screen starts with selecting the area of the screen you want to record. Once you've completed it, you can stop the recording. Once you stop the recording, you can edit the video and save it to your drive.

You can also record your webcam feed, system sound, or mic to render an MP3 file. You also get a scheduler to set automatic tasks for capturing and saving your screen. Learn more in our full Movavi Screen Recorder review.
Watch video
It is a Player where you get options to watch videos supported in a lot of formats.
You can't play H.265 codec files through this media player. This codec is not supported in the program by default.
AI Upscaling
During my review, the feature performed close to my expectations by optimizing the video quality to the tiniest bit. You can only notice the difference during a comparison.
Impact on system performance
Out of curiosity, I initially tried upscaling a 12-second-long 1080p video to 4X (4320p). It overloaded my system, and all other active background apps started misbehaving. Hence, I had to restart my device. On retry, I used a 2-minute-27-second-long 720p video at 2X (1440p). This time, performance was stable with moderate RAM and CPU usage, though processing took about 42 minutes.
Technically, it is recommended to upscale videos that are lower than 1920X1080 at most 2x. Upscaling videos more than this may increase the load on your hardware, which can result in crashing or other lags.
However, if you are keen on upscaling a very high-resolution video, updating the graphics card drivers to the latest version is recommended. If it takes too many resources, you can close all other programs since it also requires a lot of RAM.
Capture from cameras, VHS, and TV.
This feature lets you record video through the camera attached to your Computer or Laptop. If you use multiple external webcams, you can choose between them.
In the recording menu, you can select the microphone you want to use. Once selected, it will also record the audio.
Movavi Video Suite: Audio Section Features
Record Sound
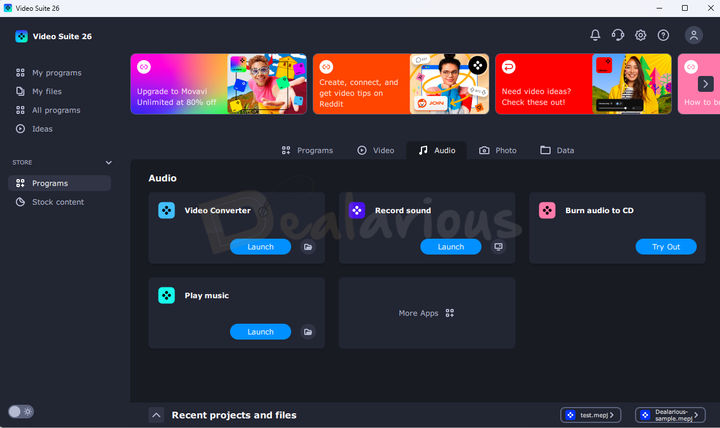
You can professionally record sound from your system or external sources like a mic here. Once you've done this, you can save, edit, and convert the input file and save or distribute it instantly.
Burn Audio to CD
There are options to easily select and write that audio on a CD/DVD instantly. You can choose from many input and output formats to burn on the CD/DVD.
Play Music
It is a simple music player that allows you to play music from your choice of input.
Movavi Video Suite: Photo Section Features
Convert Images
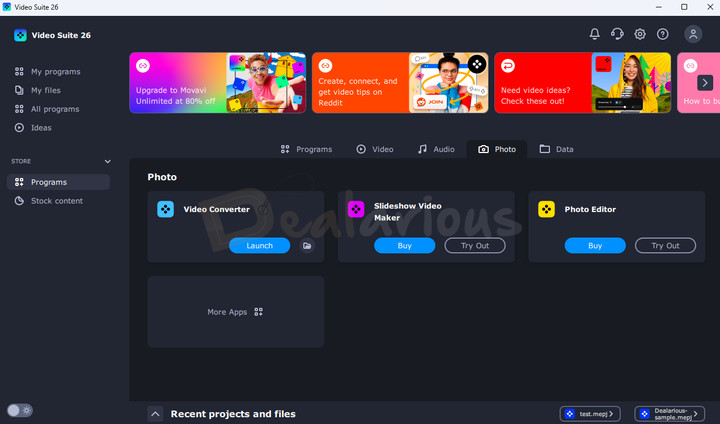
This multi-purpose converter can convert images, audio, and video to different output formats. However, for image conversion, you can only convert your images into a few popular formats, such as JPG, GIF, PNG, BMP, TIFF, and other social media formats.
Note: Converting images is part of Movavi Video Suite. Movavi Photo Editor and Slideshow Video maker are optional add-ons. If you like it, you must purchase it separately.
Movavi Video Suite: Data Section Features
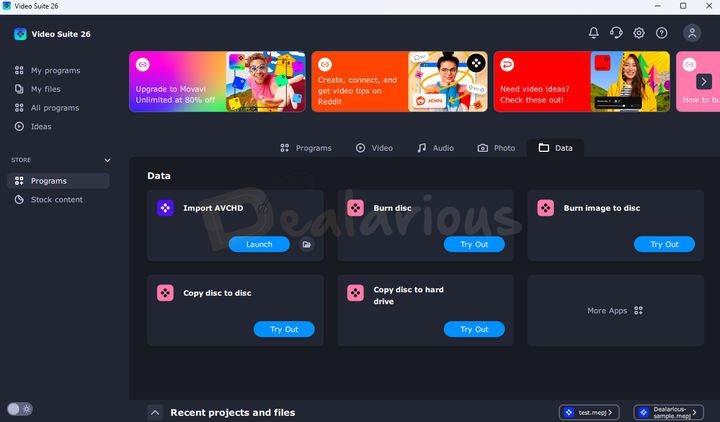
In the Data option, we have the option to import AVCHD data, a format typically used by HD camcorders and cameras. With this option, you can bring the data to your device and save it right away.
CD Burning
You also have many CD-burning options, including image to disc, copy disc to disc, and copy a disc to your hard drive.
Note: The Movavi Video Suite program includes Import AVCHD and ChiliBurner (Burn disc and everything with a similar icon).
Movavi Video Suite Store Section
In the Store section, you will find tabs for Programs and Stock content.
Most of the features under the Store tab are paid.
Application Settings & More
Most of the settings in the Movavi Video Suite 2026 can be changed and tweaked according to individual customer needs. The program also runs on 'preference-based adaptation.' It means that the program studies and adapts itself to provide the best possible layout of options that are in line with your regular usage and personal preferences.
Upon start-up, the app also asks you what areas of interest you are in using Movavi Video Suite 2026. If you choose the options presented, the app adjusts its preferences to meet your requirements.
Technical Support
You can take the first approach from the app itself. You have the option to contact support at the top right corner of the main application screen. Upon clicking, you are redirected to a web page.
There is also a support center dedicated to Movavi's website. Here, you can find many helpful resources through videos, FAQ sections, how-to guides, user manuals, upgrades, lost key recovery, and more.
Need help finding the answers you need? No worries. You can submit a manual request to the help team, and they will respond to you.
Movavi provides live chat support, but it's not offered 24x7.
Movavi Video Suite 2026 Review: Editing Performance
System Specifications used for this review:
- Processor - AMD Ryzen 5 3500U, 2100 Mhz, 4 Core(s), 8 Logical Processor(s)
- RAM - 12.0 GB
- OS - Windows 11 Home Single Language
- Graphics - AMD Radeon Vega 8 (Integrated)
I conducted a performance analysis for Movavi Video Suite, focusing on three primary components: Movavi Video Editor, Movavi Screen Recorder, and Movavi Video Converter. You can find it below:
Movavi Video Converter Performance
I tested the converter's potential performance by downscaling and Upscaling using the same source video.
Downscale: 2K to 1080P
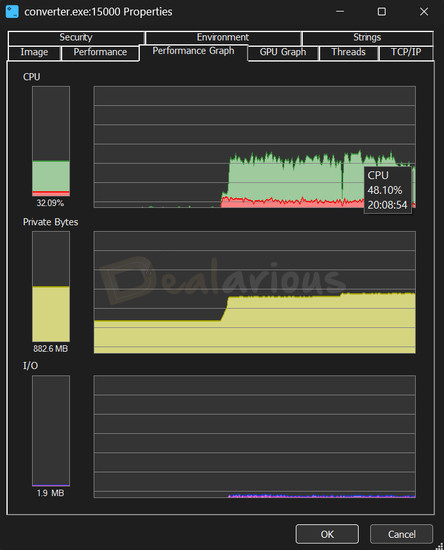
I used a converter preset for downscaling. The preset was set to 1920X1080P resolution, with the video encoding engine active for fast processing. The conversion was completed in around 5 minutes. During this time, the converter consumed a maximum of 48.10% of CPU resources, and RAM consumption fluctuated between 880MB and 890 MB.
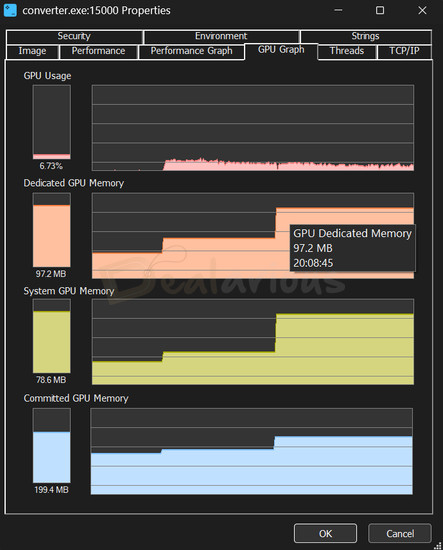
The GPU consumption hiked to 97.2MB.
Upscale: 1080P to 2K
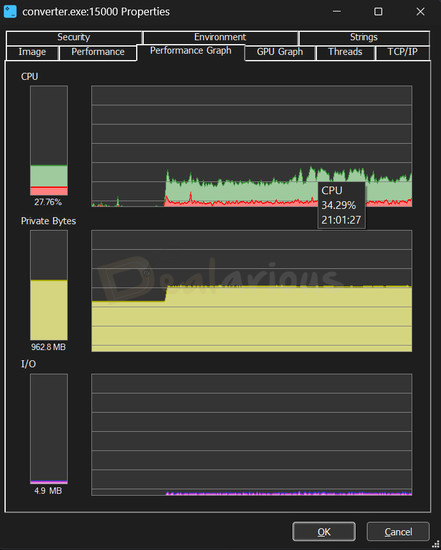
Upscaling in Movavi Video Converter took around 6 minutes to complete. The process consumed a maximum of 34.29% CPU resources, and the RAM fluctuated between 960 MB and 975 MB.
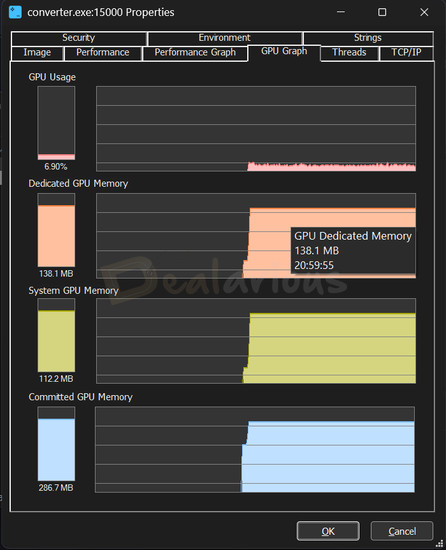
The GPU consumption was steady at 138.1 MB.
Movavi Screen Recorder
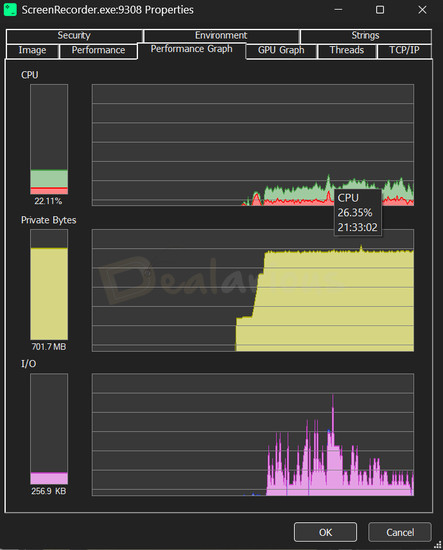
The result from Movavi Screen Recorder's performance test was a bit fascinating. When I fired up the module for the first time, Movavi Screen Recorder's resource consumption peaked. The CPU went up as high as 26.35%, and the RAM consumption hiked upto 738.3MB.
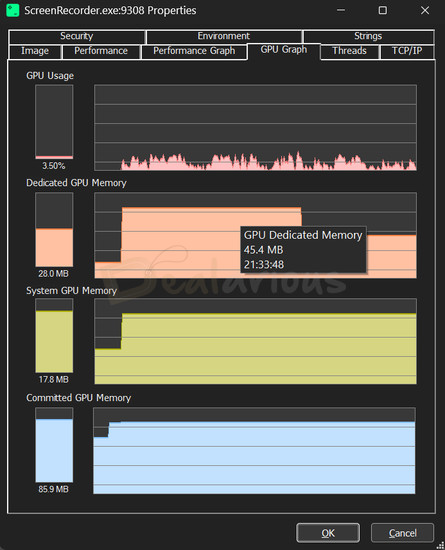
The GPU held up well. I was working on multiple tabs while using the screen recorder, and I did not face any lag.
Movavi Video Editor
Movavi Video Editor took around 12 minutes to finish the export, and the performance test results were quite impressive.
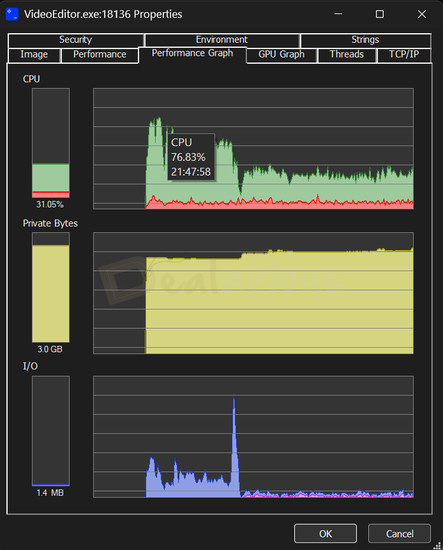
When initiating export, the CPU usage reached a maximum of 76.83%. However, with time, the CPU usage graph fluctuated between 30% to 45%. The RAM consumption remained 3GB for the rest of the exporting session.
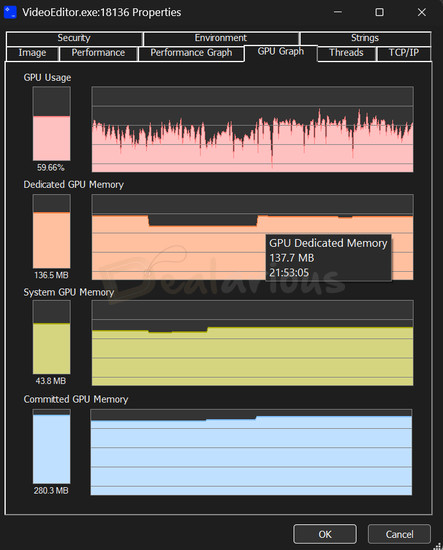
The GPU memory consumption fluctuated between 116.5MB and 137.7MB during the export.
Performance Conclusion
Throughout the tests, basic functions ran smoothly. Editing and exporting in the Video Editor did increase resource use, especially with more elements and footage.
Note: The experience of creating complicated projects will differ with devices having low physical memory (RAM) and CPU Specifications.
Movavi Video Suite: Best Alternatives
Movavi Video Suite is undoubtedly a beginner-friendly, all-in-one multimedia suite. However, it is always good to have more options. Check out these alternatives here; we compare Movavi Video Suite with the other best video editing programs.
Wondershare Filmora
Wondershare Filmora is fairly similar to Movavi. They both have intuitive, beginner-friendly user interfaces and editing layouts.
Filmora is a good choice for intermediate users. It provides users with an added advantage over Movavi by providing them with additional built-in effects and transitions. At the same time, it supports H.265 (HEVC) video format, whereas Movavi doesn't. To learn more, read our Wondershare Filmora review.
In contrast, Movavi is a perfect companion for beginner content creators. It is easy to use, cheaper, and has a shorter learning curve than Filmora.
AVS4YOU
It has a relatively outdated user interface and supports Windows PCs only. Compared to AVS4YOU, Movavi is affordable, has more advanced features, and supports Mac.
AVS4YOU is a multimedia suite with a Video Editor, Video Converter, Audio Editor, Audio Converter, Image Converter, and much more. This AVS4YOU review explains the functionalities in more Detail. You can also save a significant amount with AVS4YOU coupons.
Both Movavi and AVS4YOU come with lifetime and 1-year subscription plans. However, with a single AVS4YOU lifetime license, you will receive free lifetime upgrades. A disadvantage is that you can use a single AVS4YOU license on only one computer. A new purchase is required to use the program on another computer.
However, in Movavi, a lifetime license purchase means you will receive all minor upgrades to the current version of the program for a lifetime. You need to buy a new license for major version upgrades.
Adobe Premiere Elements
Adobe Premiere Elements is yet another excellent beginner-friendly Movavi alternative. It has a fairly clean user interface and provides an adequate user experience. Compared to Movavi, it is highly priced for the features it provides.
iMovie
Both iMovie and Movavi are multifunctional, user-friendly video editing programs. However, the former is only available for Mac and iOS devices.
The best part about iMovie is that it is completely free. Compared to iMovie, Movavi has advanced features and supports Mac and Windows.
Movavi Video Suite Review: Is it worth your money?
Short answer: Yes
Anyone who wants to enter the video production & editing space will find this application worth their time and money. Getting almost all the features you will ever need when starting your content journey at this price point is a great deal.
Advanced users may find that this app lacks certain technical features, but Movavi's main aim is to create apps that appeal to low-to-medium-budget users.
During this Movavi Video Suite review, I also found that it does not support H.265 encoding. Missing this encoder can be a deal-breaker. Hence, if you desperately need H.265 encoding, Movavi is not for you.
To meet your HEVC conversion needs, here is a curated list of the best HEVC (H.265) video converters that you can try.
Movavi Video Suite: Who is it for?
As an all-in-one program, Movavi Video Suite is a perfect go-to editing platform for amateur content creators. In this Suite, you get a Video editor, Audio editor, Screen recorder, and many more multimedia tools.
It has a very intuitive user interface packed with useful features, AI-based features, multi-layered timeline settings, and much more. You have manual control over most features, providing creative freedom and making the process simple even without audio/video editing experience.
If you are looking for more robust editing features and manual controls over your videos, you can try Camtasia Studio or Adobe Premiere for the ultimate professional touch.
Conclusion
Are you an amateur videographer or content creator who wants a budget-friendly but feature-packed multimedia editor? If your answer is "Yes," Movavi Video Suite is an all-in-one application just for you. Go for it.
Changelog
Sourojit is the Executive Editor at Dealarious and has been writing reviews, tips, and how-tos since 2008. A Computer Science Engineer by degree, he enjoys turning complex tech into simple, useful insights.
Outside of work, he’s a DIY enthusiast who enjoys gardening, long drives, and building custom PCs, often experimenting with water-cooled setups. Over the years, he has played the roles of reviewer, storyteller, experimenter, and teacher.
Your superb review does it for me. Tells me exactly what I needed to know (2020 vs 2021 version) and much more. You wrote about every feature within the video suite. A much needed review for me. Thanks !