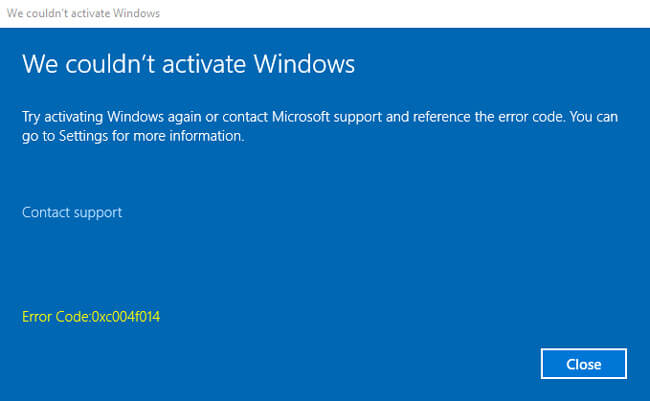
Windows 10 Error Code 0xc004f014 is faced during windows upgrade. This is an error associated with Windows 10 Activation. When you place a new license to upgrade Windows without any success and receive this error. In this article we will have a better understanding of the problem from a Home user point of view and will also cover the basic steps to resolve the issue in the easiest manner possible.
What is Windows 10 Error Code 0xc004f014?
 \
\
Windows 10 Error Code 0xc004f014 occurs when you are trying to Upgrade Windows in OEM Systems. In these systems, Windows 10 is pre-installed and activated. For security, the license key is integrated into System’s Motherboard BIOS. This mechanism feeds the license automatically while upgrade operations are performed. This mechanism causes the issue when you try to Upgrade your Windows 10, say from Home to Professional Edition.
How to Solve Windows 10 Error Code 0xc004f014
We have two ways to upgrade to Windows 10 Pro withing having Error Code 0xc004f014:
Using Generic Product Key
This is the easy way. Navigate to Settings-> Activation-> Change license key.
Now, enter the license below: VK7JG-NPHTM-C97JM-9MPGT-3V66T Proceed with the upgrade.
Once Windows 10 has been upgraded to Pro version, use the license you have purchased to activate your Windows 10 Pro copy.Extended Method (Clean Install)
We need to get Windows 10 to properly read the new license. Hence we are going to bypass the usual activation method. Instead of using “Change Product Key” in Activation Tab, we will upgrade using external Setup with the license key already entered to the Setup file. Before you Start:
- Make sure you have a good Internet connection at hand.
- A USB Storage of capacity 4 GB or more. If sensitive data is present, please make a backup.
- Keep the new License Key you have Purchased for Upgrade at hand.
- Make sure you do not have urgent work on your System for an hour at least.Let’s Start…
I) Get Windows 10 Installation Media Ready
Download Windows 10 Media Creation Tool.
You might have already used this tool to auto upgrade. However, we will just use it to download the Official Windows 10 Setup files and create a bootable USB device.
- Execute Windows 10 Media Creation Tool as Administrator. This can be done by “right-clicking” on the .exe file and select “Run as Administrator”.
- Accept the agreement and move ahead.
- Select option “Create installation media for another PC”. Click Next.
- In this step, you have to be careful. Manually Select the language, architecture, and Edition. Just UNCHECK “Use recommended options for this PC”. Select Edition “Windows 10” and Architecture “64-bit / 32-bit” depending on your PC. Language is open to your choice. Click Next.
- In Media Selection, pick USB flash drive. Click Next.
Next step will start downloading Windows 10 Files to your PC first and then write it to your USB drive. Wait for the process to complete. Follow Image below if you are still confused. 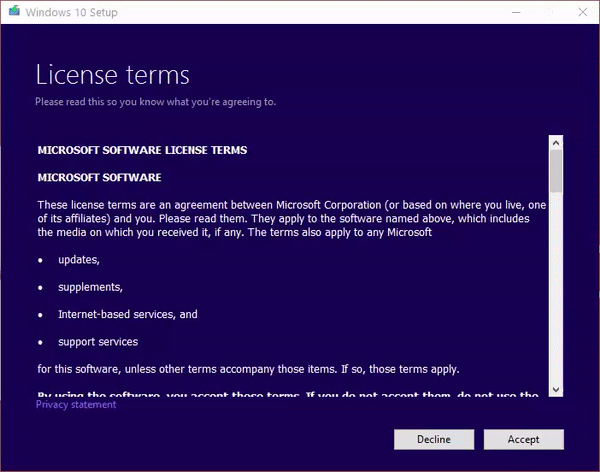
II) Tweak Windows 10 Setup
Your USB is now ready with Windows 10 files. Provide it with the new license key before starting the process. In this process we are telling Windows 10 Setup to use the license we gave and not to automatically read other embedded licenses. Feed Fixed License key to Windows 10 Setup:
- Open USB Drive Root Folder. There you will notice a folder named “Sources“.
- Open “Sources” Folder. Create a New “TEXT” file there. Rename the text file to “PID“.
- Open PID text file and enter values as shown below: [PID] Value=xxxx-xxxx-xxxx-xxxx-xxxx
- In above line “xxxx-xxxx…” represents your license key. Just copy and paste it after “Value=” without any spaces. Save the file and close it.
III) Upgrading Windows 10 without Error
Now, we have a Windows 10 Installer ready USB drive with new License key already entered. Now:
- Navigate to “Setup.exe” in USB drive Root folder. Execute it. Windows 10 Installer Starts.
- Follow onscreen instructions.
- Select to upgrade keeping your Personal files and Apps.
- Sit back and let Windows 10 upgrade. Windows 10 will be upgraded and activated as it reboots.
IV) Windows 10 Error Code 0xc004f014 FIX [Video]
Conclusion
With the above 3 sections, we can easily solve Windows 10 Error Code 0xc004f014. So, if you are getting this error, do not try direct Upgrade. You can also use ISO option for the same purpose. Just extract the ISO directly to USB and place PID file with Key. Start Installation. This method will not allow you to create Bootable USB. Bootable USB option is not require for a simple upgrade. Have other methods to solve Windows 10 Error Code 0xc004f014? Do share it with us in the comments section.
Sourojit is the Executive Editor at Dealarious and has been writing reviews, tips, and how-tos since 2008. A Computer Science Engineer by degree, he enjoys turning complex tech into simple, useful insights.
Outside of work, he’s a DIY enthusiast who enjoys gardening, long drives, and building custom PCs, often experimenting with water-cooled setups. Over the years, he has played the roles of reviewer, storyteller, experimenter, and teacher.
When I tried following your instructions, when it came time to chose between keeping my files and folders, it would not let me. It gave me a message :
you can’t keep windows, personal files and apps because your current version of windows might be installed in a unsupported directory.
I am pretty sure when I install this time that it was a clean install. I have a habit to do a clean install about every six to seven months.
Ant suggestions would be helpful.
Hi,
Please Check the link below:
https://www.reddit.com/r/Windows10/comments/3erpnn/windows_10_setup_windows_installed_in_an/
Thank you so much. This worked perfectly and when I checked computer properties it shows Windows 10 Pro and that the version of Windows is activated. Unfortunately, however, it now hangs whenever I try to run a program or check anything (e.g., open Advanced system settings). Eventually the computer comes back but it does not execute the program it just returns to the desktop. Any ideas what could be causing this?
Hi
Thanks for your guiding in this matter however, after I followed you exactly and the installation is done without any error, the control panel still displays “Windows 10 Home” instead of expected “PRO”. I use a brand new DVD W10 pro with its own key.
Any idea ?
Hi Christian,
I Guess, you are installing from a USB Drive, right? In that case if the PID file is written correctly, there should not be any issues. Your setup is still reading Windows 10 Home license from the motherboard. Please check that you have made no mistake in the PID file and that it is kept at the right place.