I have always craved good video editing software as a fellow video editing enthusiast. A good video editor should have advanced features and require minimal effort to create cool and engaging videos.
However, after exploring numerous editing applications, from the basic to the advanced, I decided to try Wondershare Filmora. It stands out as an efficient video editor, perfectly catering to those seeking advanced editing options without the need for excessive effort.
In this Wondershare Filmora review, I will share my honest thoughts on this remarkable video editing tool to help you make a better purchasing decision.
Quick Summary
Pros
- Short Learning Curve
- Advanced Video Editing Features
- Interactive UI
- Advanced Color Grading
- Instant Video Editing Modes
- Excellent performance (No Crashes)
Cons
- Limited Plugin Support
- Some Advanced Tools Take Time to Master
overall
USD 79.99
Supported Platforms: Windows, OSX
Interface
4/5
Features
4/5
Performance
4/5
Support
4/5
Before diving deep into the Wondershare Filmora review, I want to give you a quick rundown of why I found the program convenient.
- First, Filmora's interface makes it easy for individuals with different experience levels to navigate and access all the features and tools without any complication.
- You can put your creativity to work with Filmora's basic and advanced-level toolsets with ease.
- Last but not least, its introduction to AI features makes video editing more efficient and less time-consuming.
With that said, let's get started with the Wondershare Filmora review.
Pricing Plans
In Wondershare Filmora, you can choose between these three plans.
- Annual Plan: USD 49.99
- Cross-Platform Plan: USD 59.99
- Perpetual Plan (One-Time Fee): USD 79.99
Users with a Perpetual license will get access to all the advanced features, including free updates for a particular version. However, major version updates are not included. It means that all minor updates, like version 13.1 to 13.2, are free, but major upgrades, like version 13 to 14, are not included in the Perpetual plan. The yearly plan includes all free updates as well as major upgrades. The cross-platform plan will allow you to use the program on multiple platforms/OS.
The official discounted price for Perpetual Plan is USD 79.99. Our Wondershare Filmora coupons, offer great discounts on Perpetual license plans.
Filmora also offers a free trial version of the program that you can use forever but with limitations.
System Requirements
Before you buy Wondershare Filmora for your computer, it's crucial to check if your system meets the specifications below.
- Supported OS: Windows 7 and above, Mac OS 10.15 and above (64bit).
- RAM: A minimum of 8 GB RAM and 16 GB is recommended for heavy editing.
- Disk Space: A minimum of 774 MB of free hard disk space for installation
Note: An SSD (Solid-State Drive) on your system is recommended for a smooth HD and 4K video editing experience.
Tip: I recommend going through Filmora's System Requirements page to get a detailed view of the system requirements before purchasing.
Wondershare Filmora: User Interface Review
Filmora features an intuitive, user-friendly interface with no hidden menus or complex feature structures. Furthermore, it aims to enhance the user experience and attract new users.
Upon launching for the first time, Filmora greeted me with an interactive guide that assisted in importing a video from its library, applying basic effects, and exporting. Once these initial steps were completed, I could begin editing my projects.
Filmora Dashboard
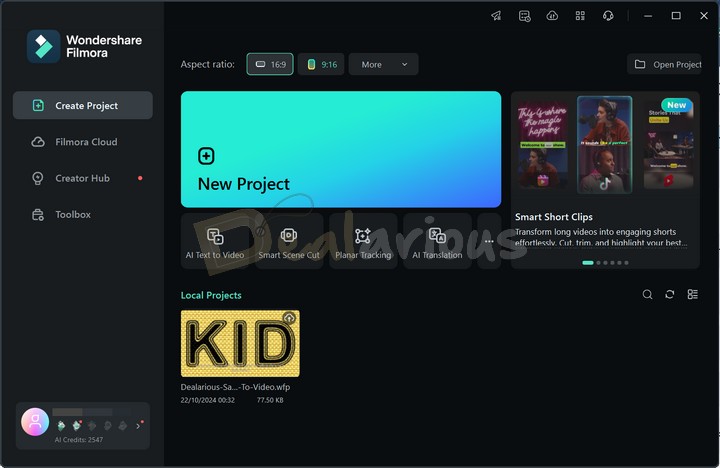
The dashboard of Wondershare Filmora is intuitively organized. On the left side of the dashboard, you will find four options to start your video editing journey.
- Create Project,
- Filmora Cloud,
- Creator Hub, and
- Toolbox
On the Create Project tab, you can start editing videos from scratch by clicking on the 'New Project' section. Furthermore, below that, you can find other quick tool options like:
AI Text to Video
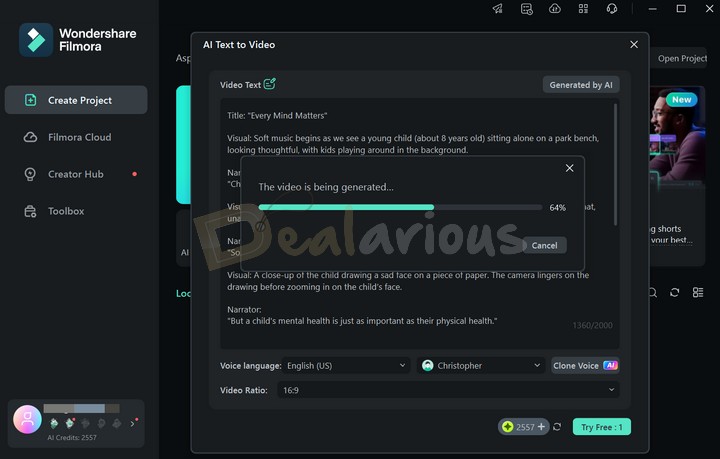
Filmora's AI Text to Video feature automatically creates videos based on scripts and prompts, eliminating the need to manually add any video or music.
Smart Scene Cut
Filmora's Smart Scene Cut feature automatically detects key elements of your liking, such as faces, objects, etc. It creates short clips from a lengthy video. As a result, you can now manage and edit your videos more efficiently without the need to manually go through a long video and split it, which can be time-consuming.
Planar Tracking
This feature allows you to create engaging visual effects by allowing objects to track the movement of a flat surface within the video, such as Billboards or laptop screens.
In a single sentence, I am in awe of this feature introduced by Filmora. The inclusion of AI Planar Tracking made the tracking task really easy. To track a moving or non-moving surface, all I needed to do was click AI Planar Tracking, select the surface that I wanted to track, and, once the tracking process was done, embed an element that would move with the selected tracking surface without any complex adjustments.
AI Translation
By using this feature, you can quickly translate your videos into 14 different languages.
To quickly create videos with AI, click the three dots beside the features mentioned above. It will take you to the Toolbox tab, where you can explore all the other AI tools introduced by the latest version of Wondershare Filmora.
Starting with video creation and editing? Check our Tips & Tricks to Edit Videos Like a Pro
Additionally, within the dashboard, you will find a dedicated section for previous projects aligned in a listicle format. You can also set the aspect ratio of your video project before getting started by navigating to the top left corner of the creative project window.
Regarding aspect ratio, if you are creating short-format videos for YouTube Shorts, Instagram Reels, etc., that require a 9:16 aspect ratio, I recommend you select the same aspect ratio from the dashboard itself. This choice will allow you to create a video project specifically tailored for short video projects and an editing window optimized for this format.
Editing Window
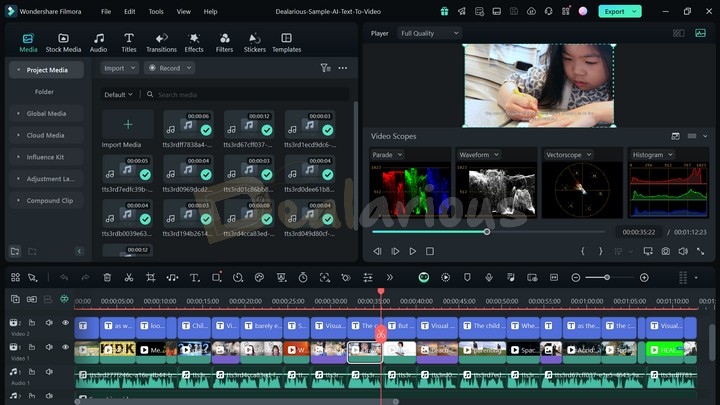
Upon clicking the 'Create a New Project' tab, the program opens the editing window. The interface layout is similar to that of other video editors. Still, Filmora distinguishes itself by offering six different layout options for editing—a feature not commonly found in other software.
All the features in Filmora are conveniently accessible on the home screen, allowing you to utilize them intuitively for efficient video editing. Performing tasks like trimming, audio adjustments, adding transitions, and visual effects in Filmora is straightforward.
The program offers a magnetic timeline approach that simplifies adding clips to your Project. When you drag a clip onto the timeline, the program seamlessly connects it to the previous clip, eliminating any space in your movie. Additionally, Filmora supports multiple timelines, allowing you to make instant changes across different tracks and preview them in real time.
Note: Filmora provides hundreds of tracks for your timeline. The track expands whenever you add another video clip above the main one.
You can easily resize and expand the editing timeline using the Ctrl+mouse wheel or navigate back and forth with the Alt+mouse wheel, which I found handy. Additionally, you can fit it to the panel or use Zoom In/Out buttons.
The customizable toolbar buttons located above the timeline offer various functions. It includes a custom toolbar from which you can drag items like Motion Tracking, Keyframing, AI Matting Tools, AI Color Palette (New), Smart BGM Generation (New), AI Tracking Tools (New), etc., into the toolbar for easy access.
In addition, the visible toolbar contains other tool options, such as Undo, Redo, Delete, Split, Crop (New), Audio Stretch, Quick Text, Drawing Tools, Speed (New), AI Color Palette (New), AI Matting Tools, Duration, AI Tracking Tools (New), Keyframing, Edit, Filmora Copilot, Render Preview, Add Marker, Record a Voiceover, Audio Mixer, Quick Preview Mode (New), Zoom to Fit Timeline (New), and Audio Meter. It made the timeline more convenient.
Editing Experience
Navigating through the features and implementation of each function didn't pose any issues for me. One aspect of my editing experience that I particularly enjoyed was the ability to change the aspect ratio of my video directly within the program's editing window panel. This feature streamlined the editing process and allowed sleek adjustments to suit different platforms and display formats.
Another aspect that I found highly useful is Wondershare Filmora's Rendering Preview feature. It allows you to render the entire timeline, enabling you to preview the final product before exporting. I am impressed by this function's addition, as it ensures a smoother and more efficient workflow. Furthermore, the Video Scope feature is another noteworthy addition to the program. It enhances the professional video experience by offering four video scopes: Parade, Waveform, Vectorscope, and Histogram.
Overall, during my Wondershare Filmora review, the program provided a positive editing experience with its user-friendly interface, well-organized timeline editing, and convenient customization options. Working with the advanced features may require some initial guidance. However, once mastered, the program offers many tools and capabilities for creating high-quality video output.
Wondershare Filmora Review: Key Features
Wondershare Filmora provides exceptional control over the visual appearance of your final video. With its advanced and efficient features, you can finely adjust and refine your videos, audio, and image assets.
Here is a detailed explanation of the key features available in Filmora:
Basic Editing Features
Trimming
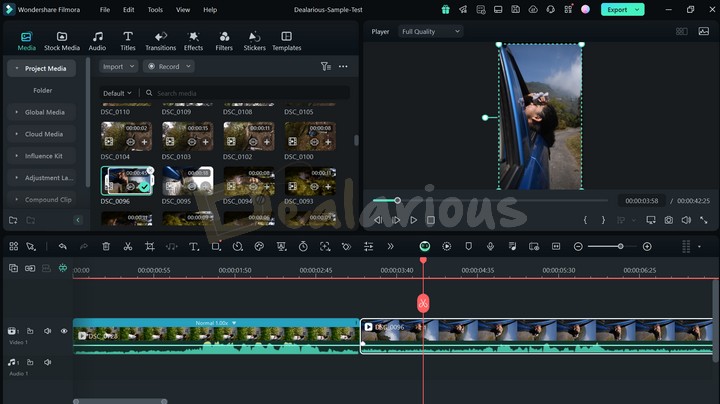
Trimming allows you to shorten your video clips by removing unnecessary sections from the main footage. Filmora provides two straightforward methods for trimming videos. You can:
- Drag the edges of a selected clip in the timeline to adjust its start and end points. Hence, effectively removing unwanted parts.
- Utilize the Split Tool to make cuts between clips, separating them and eliminating the portions you don't need.
Additionally, Filmora offers the option to trim videos using in and out cuts directly in the preview panel. It lets you preview the selected video portion and make precise cuts at specific points, ensuring that your edited clips align with your intended visualization.
Effects, Transitions, and Filters
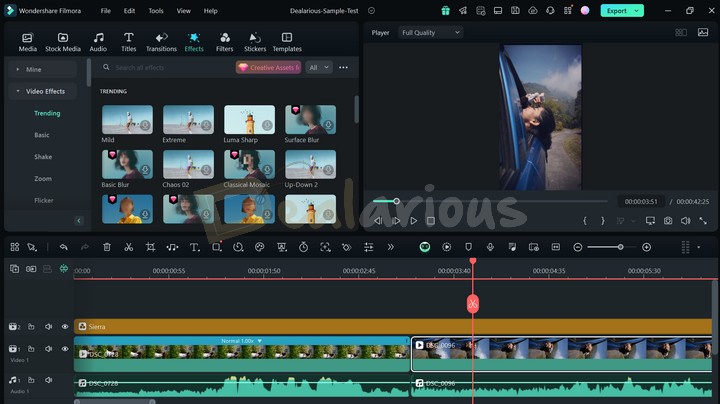
Filmora offers a wide range of graphical effects, including overlays and LUTs, for both video and audio. These effects can greatly enhance the overall quality of your videos. You can effortlessly apply these effects to your videos using files from your computer or the program's built-in collection. Additionally, Filmora's latest release, Filmora 14, offers a good collection of filters to further elevate the look and feel of your video output.
Applying these effects and transitions is as simple as dragging and dropping them onto the timeline and over a sequence. You can also add transitions between two clips by clicking the plus button in the transition effects panel at the bottom.
Color Grading
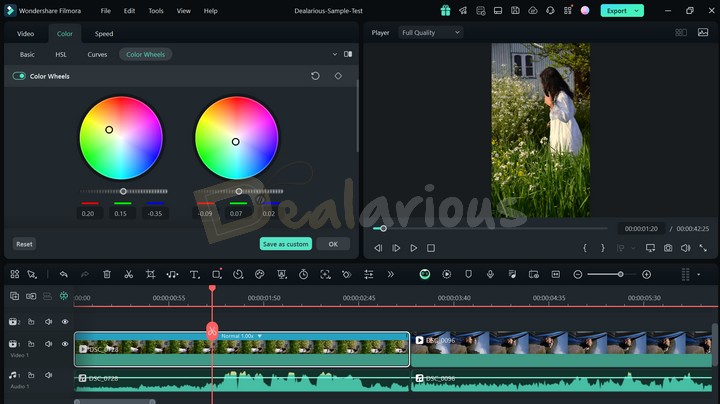
Apart from basic color adjustment controls, Filmora offers individual control over each color, curve adjustments, and color grading wheels. It allows you to adjust and enhance your video footage's overall color balance and appearance.
The inclusion of this feature in the application impressed me with its precise ability to achieve professional-looking color grades.
Audio Adjustment
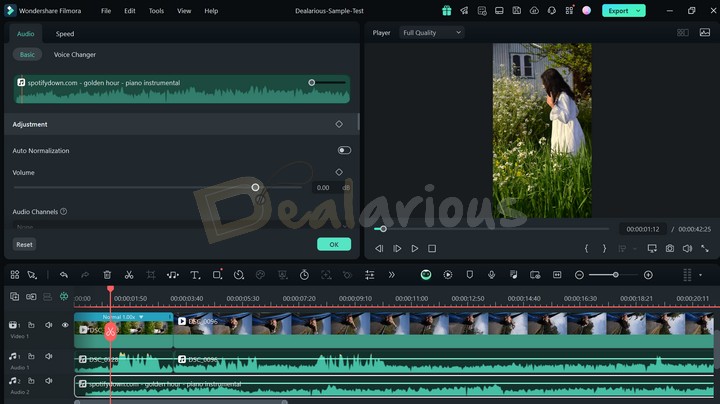
Filmora provides a range of tools and features to enhance the audio quality of your videos. The platform has included Auto Normalization and Audio Adjustment features to easily adjust the volume levels of individual clips or your entire video. You can also Fade audio in or out smoothly to create flawless transitions.
Additionally, Filmora allows you to remove background noise and enhance the audio using AI, apply audio effects, and adjust the pitch and speed of the audio. The Audio Ducking feature allows for enhanced and clear sounds. You can also add keyframes for precise control over audio changes throughout your video, which can further help you create surround sound.
Moreover, with the latest AI Voice Enhancer tool in the audio section, you can now customize your voice recording and make it sound more polished and professional. Apart from this, Equalizer and other Speed tools can customize your audio to create impressive content.
Note: When making audio adjustments in Filmora, it is important to detach the audio from your video clip to ensure you get greater control over the audio editing process.
Green Screen
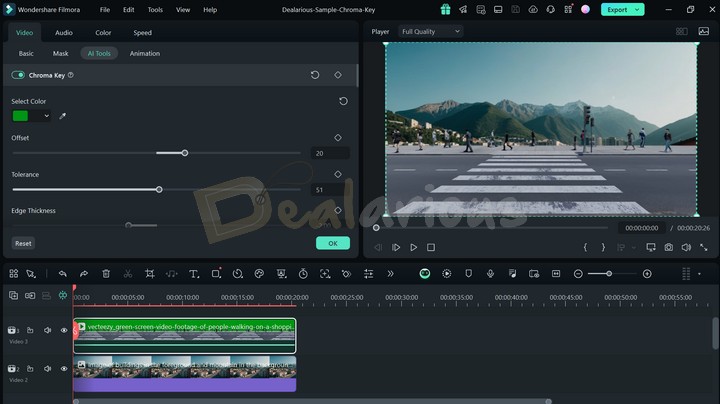
The Green Screen or Chroma Key module in Filmora goes beyond handling traditional green or blue screen applications. It lets you key out any color to create various video effects.
This module offers a range of settings, like adjusting Tolerance, Edge Thickness, Edge Feather, etc., that provide further adjustments to fine-tune your green screen videos and achieve the desired results.
Adjustment Layer
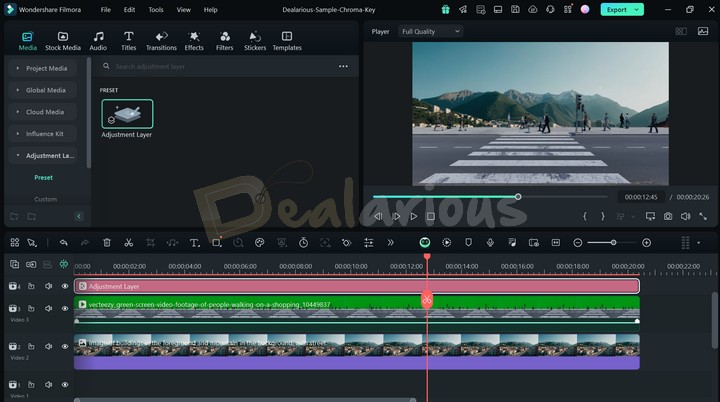
The Adjustment Layer feature in Filmora functions as a transparent overlay placed on the timeline, affecting all the clips positioned below it. You can add multiple Adjustment Layers and stack them according to your requirements, allowing you to achieve the desired visual effects and enhancements. Using the Adjustment Layer to your timeline, you can conveniently apply various effects, color corrections, filters, and other adjustments to all the clips beneath it simultaneously.
Speech-To-Text and Text-To-Speech
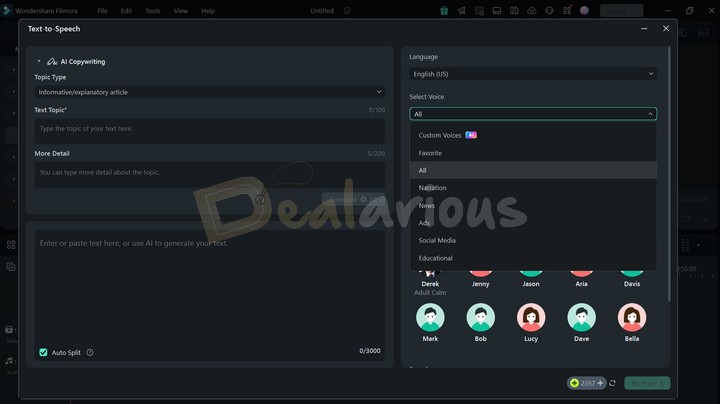
Wondershare Filmora provides a speech-to-text transcription feature that automatically generates captions for your videos. With the help of this feature, you can efficiently transcribe your audio into 27 different languages.
Conversely, the Text-To-Speech feature allows you to conveniently and efficiently incorporate voiceovers or narrations into your videos, with more than 10 different modules available. The latest version of Wondershare Filmora offers multiple language support for voiceovers, along with an option to create custom voices with the help of AI.
Furthermore, you can customize the speed and pitch of the narration, which makes the tool more proficient. Overall, the tool's inclusion is designed to save your time and effort in the production process.
Remark
Although Filmora's speech-to-text feature performs well, it could benefit from further enhancements to improve its overall functionality. Some minor adjustments can be made to refine the feature's accuracy.
Advanced Editing Features
Speed Ramping
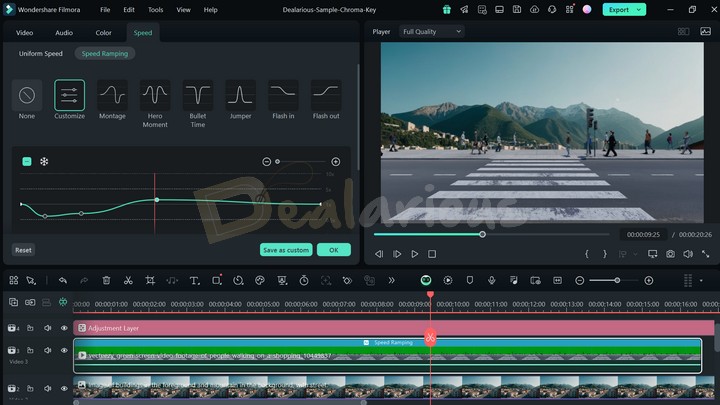
Filmora's versatile speed ramping feature provides an opportunity to enhance your video editing capabilities and create more impactful visual narratives. It allows you to manually adjust the speed by setting keyframes and specifying the desired speed at specific points within the clip.
Moreover, if you want to spice up your video using seamless transitions without any manual tweaks, then you can benefit from Filmora's AI Frame Interpolation feature. This new addition to the video editor can create smoother video frames to make your video look more appealing. Additionally, to broaden your creative horizon, you can also make use of two other features: the freeze frame and reverse speed.
Motion Tracking
With Filmora's Motion Tracking feature, you can create visually engaging videos by tracking a moving object. You can then apply text, effects, and other elements to track the object.
Filmora's flexibility allows you to effortlessly adjust and resize the tracking box frame-by-frame for precision tracking of the object.
Keyframing
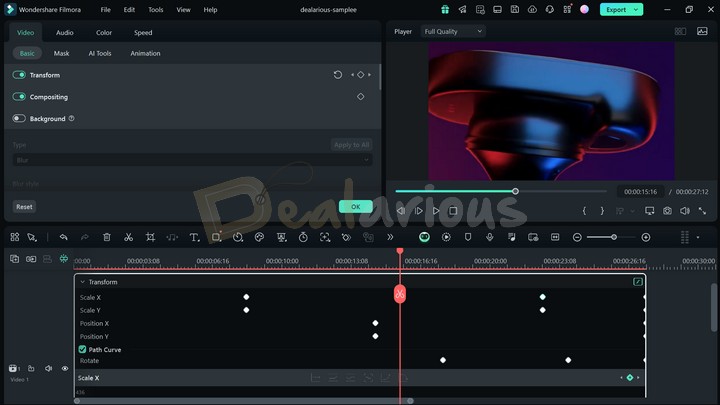
Let's address the elephant in the room: Wondershare Filmora's Keyframing tool is one of the major highlighting features of Filmora, and they have adequately enhanced its optimization.
With Filmora's new Keyframe Graph Editor, you can create smooth animations with just a few tweaks here and there. This feature allows flexibility to customize multiple keyframe points and control various video elements, such as scale, opacity, etc. The flexibility further helps elevate the visual appearance of your video, especially animation. Additionally, the Keyframe panel offers a variety of graph options, including Continuous curve, Basic curve, Ease in, Ease out, Linear, and Freeze. You can choose and apply these curves, ensuring a seamless video motion.
With the latest version update, Wondershare Filmora lets you adjust the keyframes from the timeline, which I found a little tricky to work with. This is especially true given that you get a small room to make adjustments instead of a dedicated panel, which was available in their previous version.
Tip: Getting started with Keyframing can be difficult, especially if you are a beginner. Hence, you should look through Filmora's user guide and YouTube tutorials for necessary external guidance.
Multiple Platform Support
Edit your video on the go with Filmora 13. Filmora's cross-platform support facilitates easy video editing across multiple devices, including Windows, Mac, Android, and iOS, increasing its accessibility.
By utilizing the cross-platform capabilities, you can effortlessly transfer and continue editing your half-done video projects across different devices, enhancing productivity and convenience.
Note: Filmora offers users 1GB of free cloud storage as a complimentary feature. However, when the storage limit is reached, you must purchase additional space to continue utilizing the cloud-based functionality on different platforms.
Besides that, Filmora lets you work on one device at a time. Hence, you can't simultaneously work on two devices that share the same Wondershare account.
Video Review and Collaboration
With Filmora, you won't have to manually seek reviews from team members. The software provides a seamless cloud-based collaboration experience, allowing you to easily work with your team of video editors and reviewers.
Team members can access the shared Project using the collaboration feature and add time-coded comments, notes, scripts, media files, and much more. Hence, it becomes convenient for you to review and address feedback.
Assets Backup and Sync
Filmora offers users a high-quality benefit through improved media file management. Using the Wondershare ID, you can conveniently back up all your imported media files, favorite effects, project files, custom-created titles, and more.
This feature is highly beneficial as it ensures the safety of your critical clips and assets, which can be retrieved anytime using your unique Wondershare ID.
AI Audio Stretch
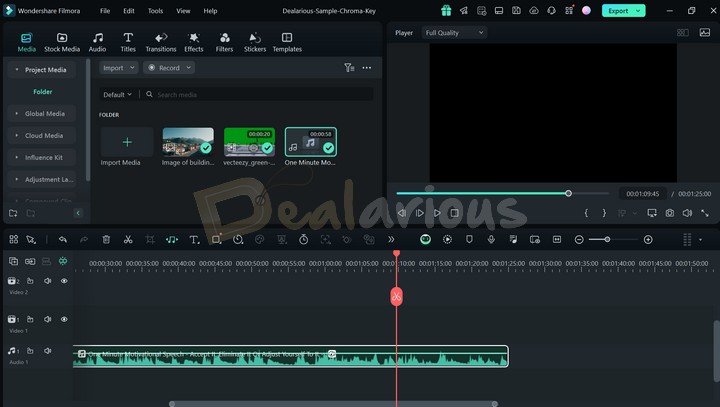
In scenarios where the video duration is longer than the assisting soundtrack, editors usually copy and paste the audio and merge the clips to match the length. However, this process becomes much simpler with AI Audio Stretch.
By eliminating the need for manual looping and applying transitions, AI Audio Stretch not only saves time and effort in editing your videos but also helps stretch the audio clip and automatically adjusts the soundtrack to fit the entire video clip. During my Wondershare Filmora review, this feature worked unexpectedly well.
AI Smart Cutout
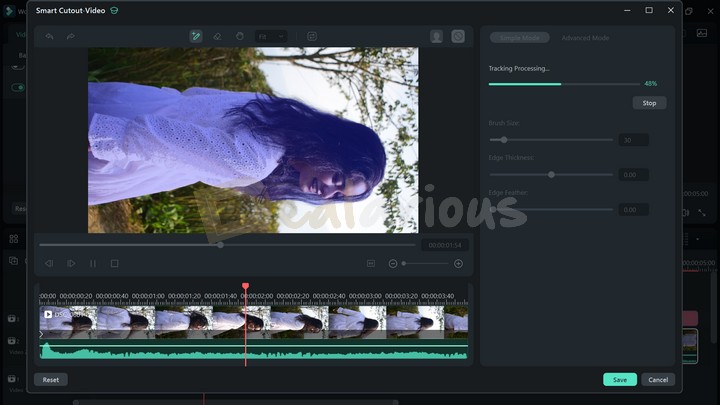
Now you can remove backgrounds without the help of a green screen. The Smart Cutout feature allows you to easily remove the background from your video and bring out the subject.
Remark
In my review of Wondershare Filmora, I found the Smart Cutout feature to be both effective and precise. Additionally, in contrast to my previous experience, the latest upgrade performed exceptionally well by taking significantly less time to process and cut the marked subject.
Furthermore, those who want to perform manual scene-to-scene cutouts can also benefit from the Advanced Mode, which I found to be an impressive addition to the feature.
AI Copilot
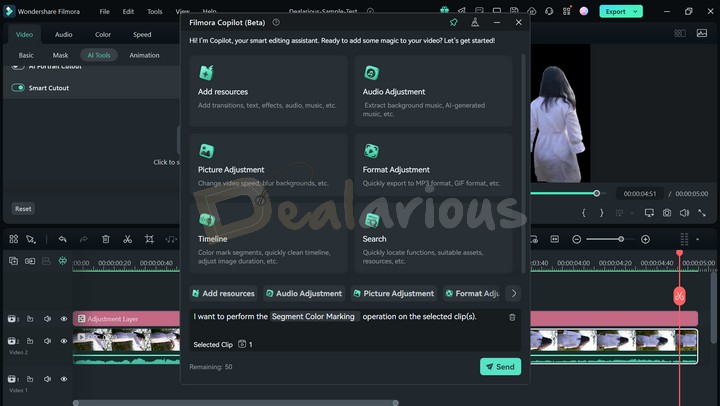
This feature is especially handy for those who need help finding specific features within the platform and who frequently look through manual guides. You can find this feature in the toolbar section and have interactive conversations with the bot. Based on your prompts, the bot will utilize its advanced algorithms and analyze them to suggest suitable edits, transitions, effects, app features, etc.
However, there's a slight drawback to the feature. AI Copilot is currently limited to 50 prompts a day, with no option to upgrade the limit, which I found to be restrictive. But I hope to see improvements in future updates.
AI Smart Masking
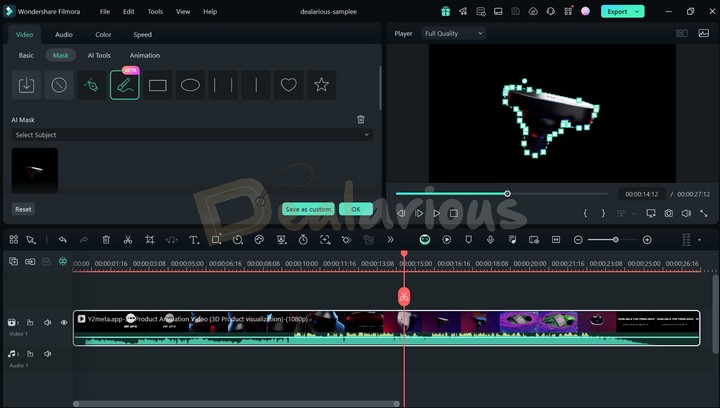
It can be difficult to draw a custom mask whenever you need to create a cutout of an object in your video clip. But Filmora's AI Mask feature can save you a lot of trouble. With the AI Mask tool, advanced algorithms analyze the subject or character, or you can manually brush the object and create a precise cutout.
Additionally, you can adjust the blur strength, opacity, and extension around the object to ensure a natural and seamless appearance. This feature gives you greater control over the visual elements of your video. It allows you to highlight specific areas or objects with precision.
Compound Clip
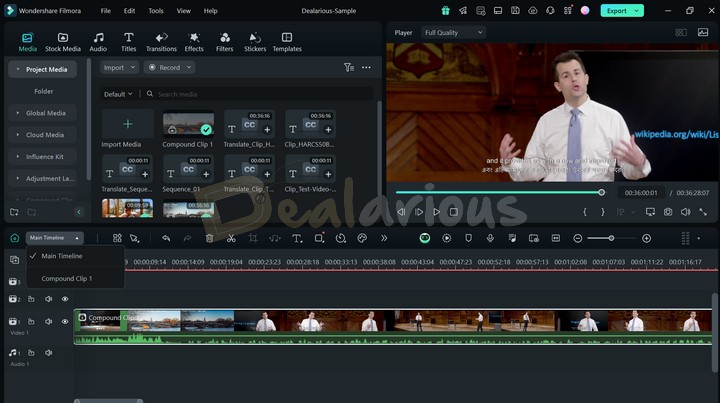
With Filmora's Compound Clip feature, you can combine multiple separate videos into one and edit them simultaneously. I found this feature efficient. Previously, when editing different videos, it felt tedious to edit different clips and their components, often creating a lot of clutter in the timeline. This feature makes the job easier.
Combining multiple videos into one scene using the Compound Clip tool helped me keep the timeline organized and edit the videos in different environments without cluttering the timeline. It is majorly effective while applying color grading, and keyframe adjustments.
New Feature Additions
Here is a list of new features in Wondershare Filmora 14 that enhance its efficiency.
Smart Short Clip
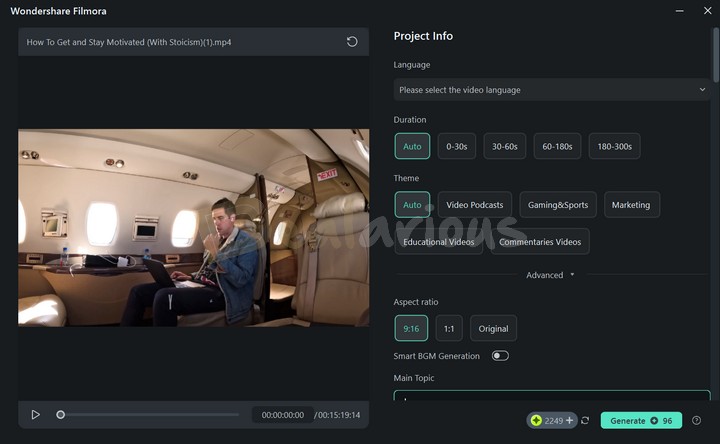
It is a new feature introduced by Wondershare Filmora to cater to the needs of content creators focused on creating short-form video content. Using this feature, you can create a short video from a long-form video or by pasting a YouTube link.
Filmora allows you to customize a few aspects of this feature so that you can somewhat control the outcome of the footage, such as language to create subtitles, duration, theme, aspect ratio, and smart BGM. You can also jot down a topic into the feature so that the AI functions well and creates a video that you can export directly. However, suppose you are not satisfied with the AI-generated video. In that case, you also get the option to edit the video manually once the processing is done.
Remark
This feature is in the early stages of development, so there was a slight delay in processing.
AI Video Enhancer
As the name suggests, Filmora uses AI to enhance video clarity with just a single click. This feature is especially ideal when you need to improve old and blurry video footage quickly, as it eliminates the need for manual tweaks, which can be both daunting and time-consuming.
Multi-Camera Editing
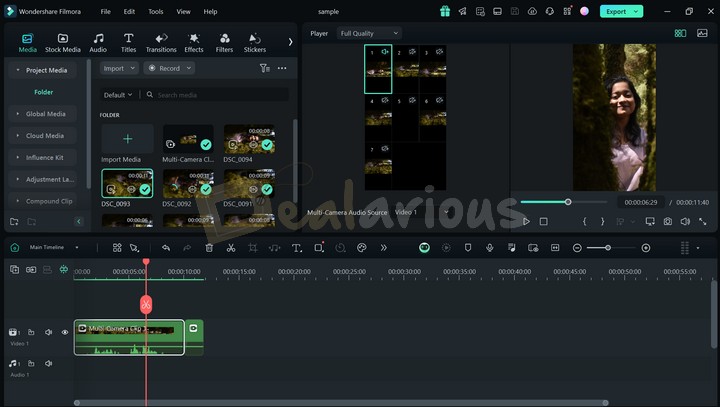
This feature can be very effective if you want to blend multiple camera angles into one footage without going through a tedious, time-consuming process. However, during my Wondershare Filmora review, I found this feature to be a little tricky to grasp in first instance. It will take some practice and some guidance from YouTube tutorials to use the Multi-Camera Editing feature correctly. Once learned, this feature can save loads of time by blending different camera angles into one frame for a smooth and engaging viewing experience.
Smart BGM Generation
Are you tired of searching the web for background music? Filmora has you covered. The Smart BGM feature analyzes your video and generates background music that matches its theme and mood.
However, if you are into professional editing, the generated music can feel very musical. Hence, until Filmora improves the feature further, look for other ways to add music to your video. Otherwise, if you are into basic video editing, this feature can do the job for you.
Other Noteworthy Features
Besides the advanced features mentioned above, you can benefit from Filmora's other useful AI and advanced toolsets to improve your video editing efficiency and outlook. It includes features such as:
- AI Translation
- AI Face Mosaic (New)
- Auto Reframe (New)
- Screen Recorder
- Instant Cutter
- AI Copywriting
- AI Audio Denoise
- Auto Beat Sync
- AI Color Palette (New) and more.
Wondershare Filmora: Export
Wondershare Filmora offers an extensive selection of export formats, allowing you to choose the one that perfectly fits your project requirements.
- Local: This option allows you to create video file formats commonly used for local storage or playback.
- Device: It offers presets tailored for popular video-viewing devices such as iPhones, iPad, and smartphones.
- YouTube, TikTok, and Vimeo: These options are optimized according to the latest best practices for uploading videos to these specific online platforms.
- DVD: This option enables you to create standard MPEG2 files suitable for burning DVDs, with the ability to burn the discs directly.
Each export option comes with a default set of parameters and file types, which are considered optimal for their intended purposes. However, you can fully adjust these settings according to your preferences.
One aspect I appreciate about the export panel is the inclusion of thumbnail pictures, which is very thoughtful. Under the Thumbnail section, click the edit button to start creating your own customized thumbnail. From there, you can pick scenes from your video and tweak them or add a new image from your local drive and edit it. Additionally, the feature offers a bunch of thumbnail presets with which to work. But if you feel creative, you can use their inbuilt editing tools, like adding text and images, cropping, rotating, etc.
Note: These editing features aren't as advanced as other design platforms, but they'll do the job.
Tip: I suggest starting with a template from the template gallery and customizing it for better results.
Wondershare Filmora Review: Performance
The system specifications during the test of Wondershare Filmora Review:
- Processor: AMD Ryzen 5 3500U, 2100 Mhz, 4 Core(s), 8 Logical Processor(s)
- OS Version: Windows 11 Home Single Language
- RAM: 12GB
- Disk: 512GB SSD
- Graphics: AMD Radeon Vega 8 (Integrated)
Idle State Resource Usage
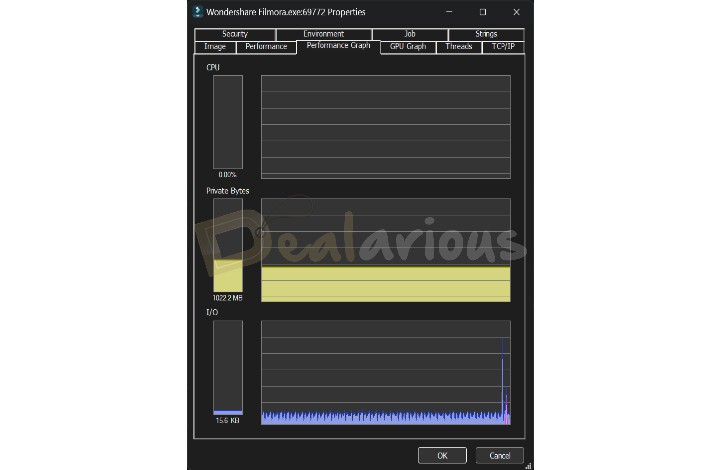
During the idle state, the CPU and GPU consumption of Filmora was at 0%, while the RAM utilization was at 1022.2MB.
Editing Process
While testing, I added a 15-minute 2K video with a frame rate of 25FPS using Filmora. To assess Filmora's performance, I trimmed down the video to 10 minutes and incorporated small clips of 1080P resolution.
I encountered no noticeable lag while utilizing Filmora's features, such as transitions, effects, AI Image, Speech-to-text, etc. One noticeable improvement from my previous experience with the program was that I did not encounter any loud fan noise, even though I kept a few tabs open in the background for other tasks.
No doubt, Filmora exceeded my expectations yet again with its powerful performance and smooth operating capabilities.
Export Settings
Video Length: 10 Mins (Trimmed Down)
Format: MP4
Quality: High
Resolution: 1920X1080
Frame Rate: 24 FPS
Size: 701.28MB
Exporting Process
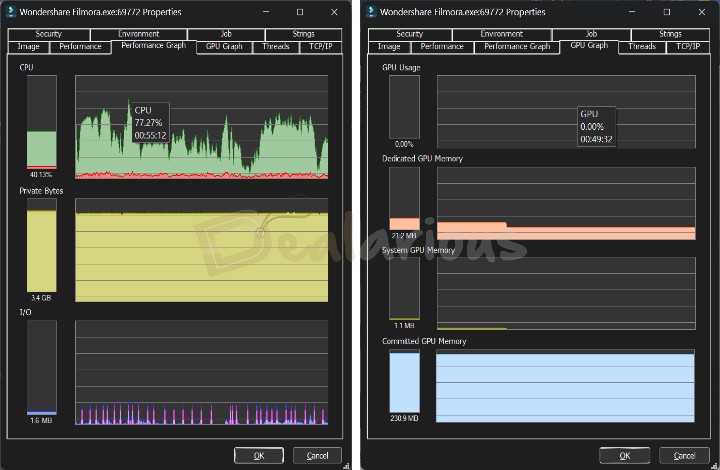
The exporting took around 15 minutes to complete. Filmora's CPU usage fluctuated between 34% and 60% throughout export performance testing, peaking at 77.27%. RAM consumption remained steady at 3.4 GB, occasionally spiking to 3.6 GB. Additionally, graphics memory usage remained constant at 21.2 MB.
Remark
My experience editing and exporting videos using this platform was exceptionally good. Filmora exceeded my expectations while rendering videos on a system with low specifications. However, the rendering time might take longer if you add many elements to your production. The no-lag performance felt incredibly soothing while making edits, especially when using large video files.
How Good is the Support?
Wondershare Filmora, similar to other Wondershare products, provides excellent software assistance. To access their live support assistant, click on the support icon at the top of the dashboard.
You can also refer to their user guide and YouTube Channel to better understand the product. However, should you encounter an urgent situation, you can request a callback from their support assistant via the Wondershare contact page.
Wondershare Filmora Review: Overall Experience
What I Like
Filmora caught my attention primarily for two main reasons.
- It offers a comprehensive suite of essential video editing tools and features. It covers all the necessary aspects of video editing, including a vast library of stock multimedia files, keyframing, motion tracking, transitions, etc., that you would require for your video project.
- Filmora has a short learning curve, which makes video editing quick, easy, and efficient for users of all levels. Its standout functionality lies in its beginner-friendly design, which removes the complexities of using editing tools, curves, and shortcuts.
- I am amazed by the significant performance improvement Filmora made in its latest update. During my Wondershare Filmora review, the AI features processed exceptionally well and fast without consuming much time, which is contrary to my previous experience with the program.
What I Dislike
Although the program functions well as an efficient and user-friendly video editor with comprehensive editing capabilities, I have encountered several things that could be improved during the editing process.
- Mastering features like speed ramping, freeze-framing, and other advanced tools can feel somewhat complex.
- The application's graphical effects and plugin support are limited compared to other professional video editing software options.
Alternatives
Movavi Video Editor
Filmora and Movavi are strong rivals in video editing. Movavi Video Editor is designed for beginners and intermediate users, offering various features like trimming, merging, cropping, etc. It has better audio effects than Filmora. Additionally, Movavi is cost-effective and runs smoothly on computers. You can learn more about this program in our Movavi Video Editor Review.
Movavi Video Editor doesn't include an inbuilt screen recorder. For that, Movavi has a separate Movavi Screen Recorder program. However, the Screen Recorder feature also comes bundled in the Movavi Video Suite package. Learn more about the all-in-one suite in this Movavi Video Suite review.
However, Filmora excels in advanced features, such as HEVC support and screen recording, along with its new additions mentioned in the article. These capabilities make Filmora a top choice for more experienced video editors.
AVS Video Editor
Filmora and AVS Video Editor are two popular video editing programs, each having its own strengths and weaknesses. AVS Video Editor is known for its simple and easy-to-use interface. It provides basic video editing tools, along with a great addition of the chroma key feature.
AVS Video Editor is included in the AVS4YOU Unlimited subscription package, which you can get at a reasonable price. For more details, check out our AVS4YOU Review.
While AVS Video Editor works well for basic video editing, it lacks the powerful features and high-quality results that Filmora offers. Filmora stands out with its impressive features and excellent video outcomes. Also, AVS Video Editor is available for Windows PCs only, and Filmora is available for Windows and Mac.
Adobe Premiere Pro
Experienced editors and content creators favor Adobe Premiere Pro for its advanced features and professional workflow. It’s a great choice for complex projects, offering various tools, effects, and customization options. However, it requires a powerful computer to run smoothly.
On the other hand, Filmora is more beginner-friendly and budget-friendly. It can still produce satisfactory results on a low-budget PC while providing access to some advanced features.
Checkout our Best list of easy to use Free & Paid Video Editors for Beginners.
Frequently Asked Questions
Is Filmora suitable for beginners?
Yes, Filmora is specifically designed with beginners in mind. With its user-friendly interface and simplified editing tools, beginners can learn and use the software with ease.
Can I use Filmora on different operating systems?
Filmora is compatible with both Windows and Mac OS, allowing users to use the software on their platform of choice.
Conclusion
Over the years, Wondershare Filmora has done an impressive job of adding many advanced features without compromising its user-friendly nature, which is truly remarkable. It offers a great balance of being easy to use while providing a wide range of editing tools, making it suitable for users of all skill levels. As a video editing enthusiast, I would highly recommend this program to anyone seeking a budget-friendly video editing tool that offers both quick and advanced features.
Have you used Wondershare Filmora? I'd love to hear about your experiences and thoughts in the comments below. Let's continue the conversation deeper into the world of video editing together.

A Tech Enthusiast who adores the creative flow of nature, practices the philosophy of life, and wanders to explore multiple places. I solely believe the union of technology and nature can create a positive impact on the evolution of living beings on this planet. Above all I am an ardent learner who loves to share her translucent experiences.
Filmora is an awesome multimedia editor. My biggest complaint is the deeply imbedded “buy this, buy that” Nagging. I Paid for this program. REMOVE the #$%$#$% ads! Also, on that same note, Sorting through the assets to find one that you don’t have to pay more for is pulling teeth. It’s their ridiculous greed. Is there a way to remove all of the extra cost content. I am more than impressed with the base program, buy not likely to refer it to anyone for the above reasons. When I find a program that I like I’m happy to pay for it, but this type of built in BS prevents me from investing anymore of my money into their greedy pockets. Maybe next time I’ll just torrent a Hacked copy. Change my mind.