More than 1100 photos are uploaded on Instagram every second, according to Internet Live Stats. As a result, it is the need of the hour to use the right tools to help you stand out from the crowd. In this Movavi Photo Editor review, I will go through the features and how they can enhance your experience.
In general, learning and using professional-level tools and software can get time-consuming, expensive on your pocket, and sometimes, Boring.!! With this exact need of budding photographers, Movavi has a perfect application ready – Movavi Photo Editor 2024.
Movavi Photo Editor Review: Quick Glance
Pros
- Simple Interface
- AI auto enhancements
- A lot of Handy Tools
- Value for Money
Cons
- AI needs improvements
- Email Support is slow
overall
USD 32.95
Supported Platforms: Windows, OSX
Ease of Use
5/5
Features
5/5
AI Application
4/5
Support
3.5/5
Pricing
Has your free trial ended? You can switch to the pro version by purchasing the official website's lifetime license for USD 69.95. However, you can get upto 60% discount using Movavi Photo Editor Coupons from Dealarious.
Note: Photo Editor Older version Customers
There are 2 different versions of Movavi Photo Editor
- Movavi Photo Editor 2024(Current version)
- Movavi Photo Editor 6 (Old)
The older version Photo Editor 6 is no longer available for sale, but the support is still available. You can use the older versions with no renewal, additional charges or expiration dates. The latest update for version 6 was 6.7.
The current version of Photo Editor 2024 includes 34 new preset collections, manual preset creation, AI-driven tools, and much more. If you are using the old versions, you must use a trial for the latest version before making the Upgrade decisions.
Movavi Photo Editor: Key Features Review
Movavi Photo Editor: User Interface Review

Since 2004, Movavi has developed reliable apps like Movavi Video Suite that are easy to use and effective in inspiring creativity. They have made processing, creating, and sharing your media content fun and fulfilling!
The keyword here is 'easy'; they live by this principle.
Movavi Photo Editor is a very simple-to-use app with a very intuitive interface. When you launch the editor, a screen appears. Here, you can add the files for editing by clicking on the Add image button, Open files or folders from the File menu, or by dragging and dropping the file for editing.
All the tools are easy to find on the vertical toolbar to the left and easy to use for a user of any skill level. Also, you can view the 'Before-After' photo transformation at every step by pressing the 'B' key on your keyboard or holding the mirror icon at the bottom of the window. It will allow you to see how the editing has turned out and help you choose the path further.

All the changes can be easily reverted to the start through the ' Revert changes' option. This option can be found by navigating to the bottom of the window and clicking on the three dots.
Note: When using the program, you can import multiple photos but edit only one photo at a time. Movavi Photo Editor allowed me to easily open or add Folders but has removed the photo manager function from their previous version (2023) update.
Movavi Photo Editor: Functionality
Adjust
The first tool on the left-hand navigation bar is 'Adjust.' It holds some key tools inside to adjust vital photo parameters. You can do manual or automatic adjustments.
AI Adjust
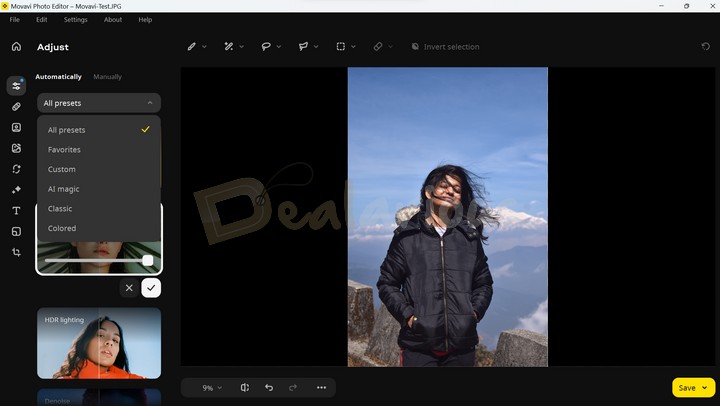
With Artificial Intelligence Technology, you can enhance your photos with the creative and efficient presets included in the editor, like Auto correction, HDR lighting, Image enhancement, Denoise, etc. You can also apply Movavi's 34 new preset collections to enhance your picture's depth.
Helpful Tip: Applying the 'Natural Tone' preset on your picture will significantly enhance the look of your image compared to other presets available.
Note: The default set of presets Movavi Photo Editor offers is limited in terms of its capabilities. Also, when it comes to tweaking the presets, the only option available is to modify their intensity level.
Adjust (Manually)
You can create your own Presets with Movavi Photo Editor. You can manually create a preset by using the available settings and then Save the preset.
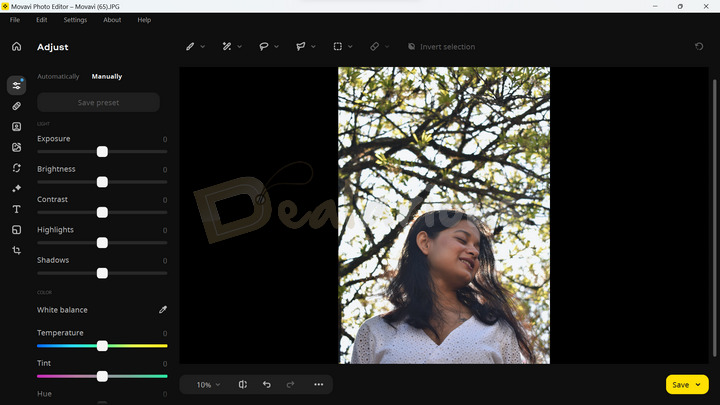
Note: If you apply any of the settings from the sections above, the AI adjust option will be turned off automatically. Hence, it is recommended to either manually adjust your picture or apply an existing preset.
Light
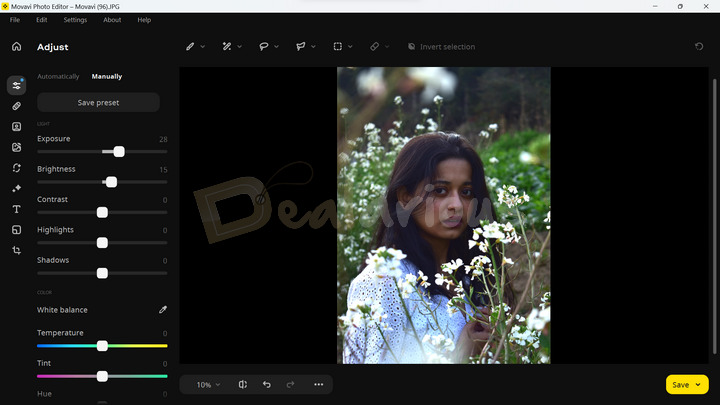
The Light function can control your photograph's Exposure, Brightness/Contrast, and Highlights/Shadows.
Color
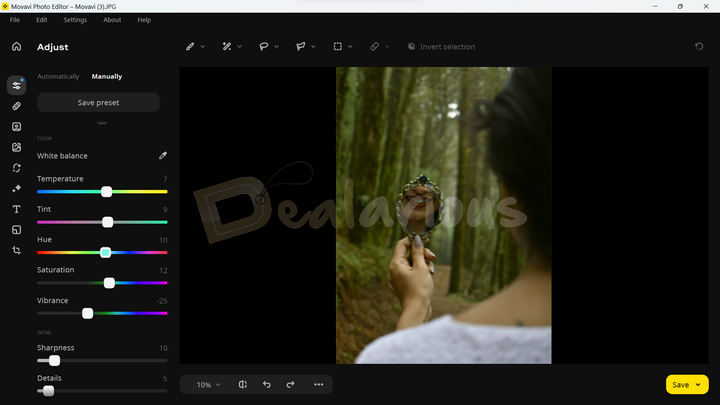
You can control your photograph's color Temperature, Tint, and Hue through the color bar. Further, you can increase or decrease your photo's saturation and vibrancy. It will take some trials for you to hit the sweet spot.
Thoughts: I wish Movavi Photo Editor had a feature that allowed me to adjust each color separately, making the photo more vibrant and visually impressive.
Detail
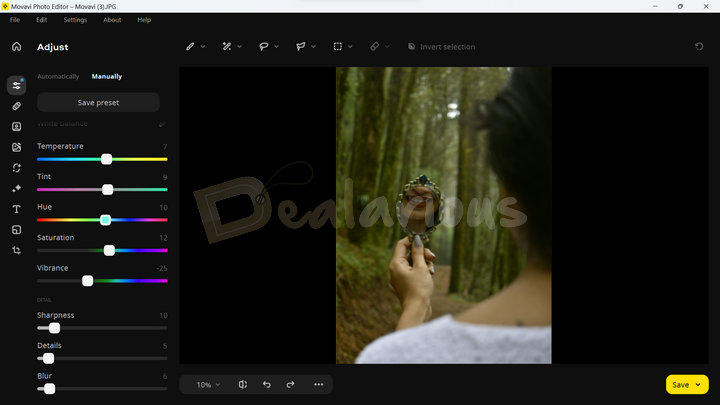
Under Details, you can increase photo Details or Sharpness and add a Blur if required.
Erasing objects
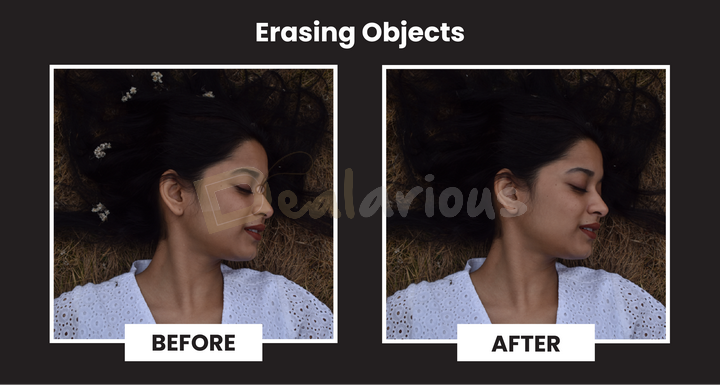
It is a fantastic tool that majorly works with an AI engine. It can erase an object automatically or manually from your photo and fill up the void space with a seamless background from behind that object.
Imagine someone photobombing your perfect beach picture; yes, now you can erase him from the picture without anyone knowing about it, ever.!!
With my sample photo for this Movavi Photo Editor review, I first chose to remove the object automatically. The AI did a good job once I removed the object by selecting it. However, after removing the object, the stitching was not perfect. I had to do some manual adjustments to fix the photo.
If unsatisfied with the results, you can retry the erasing process by adjusting the selection area or manually removing the objects by switching to Manual mode.
The Manual mode has six selection tools that help you select a particular object or area in your photo for removing objects. It includes a Selection Brush that can freely select objects, a Magic Wand, a Polygonal Marquee tool to select objects with an outline, and an Eraser that de-selects areas on the photo. Hence, you can apply effects specific to the selected area only.
Impression: The Erasing objects tool in Movavi Photo Editor 2024 is great for removing small objects effortlessly and achieving smooth results. However, when removing larger objects, the tool may not produce polished results immediately, requiring more effort to achieve the desired outcome.
Stamp (Clone) Tool
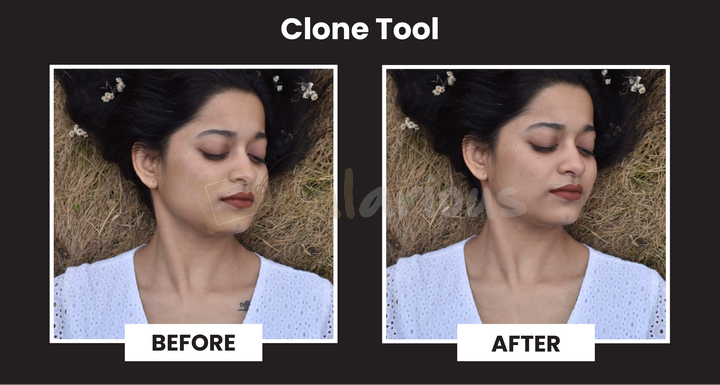
The Clone stamp retouching tool is incredibly handy for covering up your unnoticed mistakes in a photo. You can replicate a clear portion of your existing image by pressing the alt key and then pointing your cursor above the place you want to cover up. You can find this tool in the Erasing objects feature.
Picture in Picture
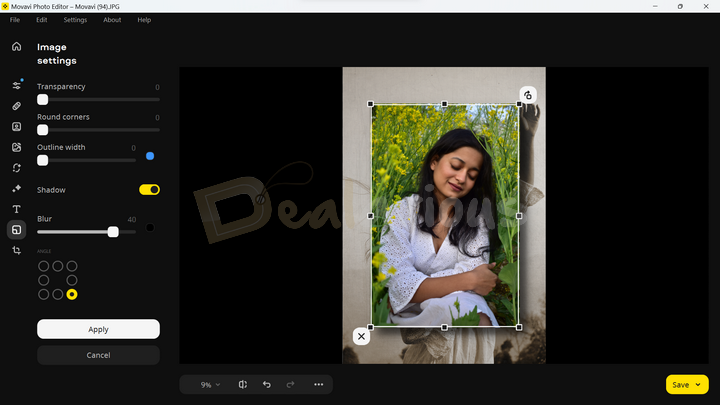
This feature lets you combine and overlay pictures to create a new picture.
First, click on the 'Picture in Picture' tab from the left-hand navigation bar. Next, click the 'Paste an Image' button, choose a picture, and click Open. The picture appears on top of the background picture. Using the Image Settings, you can change the Opacity, Outline width, make Rounded corners of the picture, and much more.
Change background
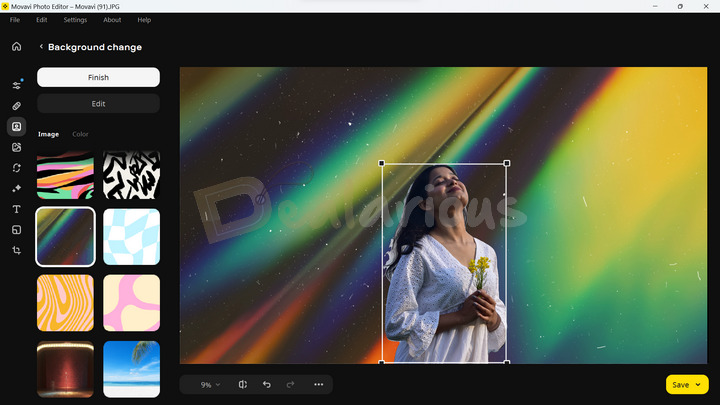
It is a convenient utility for many editors. It also benefits people who frequently work with portrait photography and frequently change their models' backgrounds after the photoshoot.
This tool can change your subject's background in a few steps. You can either remove the backgrounds automatically or manually. Then, replace the background with a solid color, transparent background, or any custom background as required.
Note: When automatically removing the background from an image, redundant elements often remain attached to the subject. Hence, to avoid irrelevant patches and achieve a better outcome, it is advised to use the brush tool to erase those areas.
Retouching
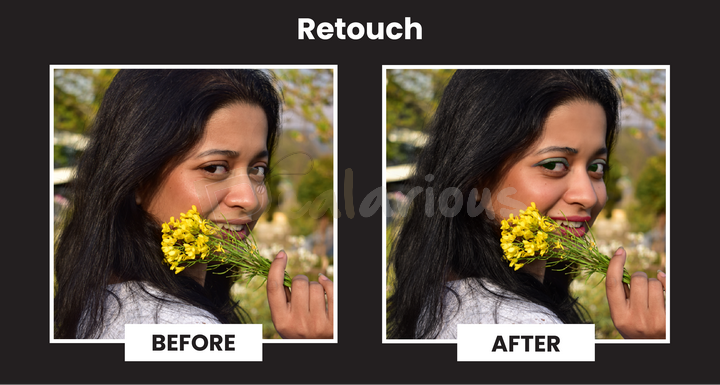
This tab hosts some of the favorite tools for fashion photographers and portrait photographers alike. Photo retouching can be done automatically or manually. If you want to manually retouch the photos, these retouching tools are available.
The Skin tab hosts options like Skin smoothing, Wrinkle removal, Blemish removal, or Shine removal. It goes a step beyond by even adding a Foundation to your model's face, including a Blush. This set of tools is handy for touching up your photographs after the photo shoot without having to learn a lot of complex tools and software.
Also, there are elaborate options to correct or retouch your model's eyes, lips, teeth whitening, and even hair color. During my Movavi Photo Editor review, it took some time for me to master the retouch section completely. Hence, it would be best to be patient while handling this section.
Also, you get options to change the Eye color, add Mascara, Eyeshadow, and an Eyebrow pencil to your model's face.
Pro Tip: Try to zoom in to the photo section where you want to apply the effects. Zooming in helps to work with precision.
I found the retouching feature in Movavi Photo Editor 2024 impressive. It proved a fast and efficient tool for removing minor blemishes from the subject's face. Additionally, including other retouching features enabled me to enhance the overall appearance of the subject.
Effects
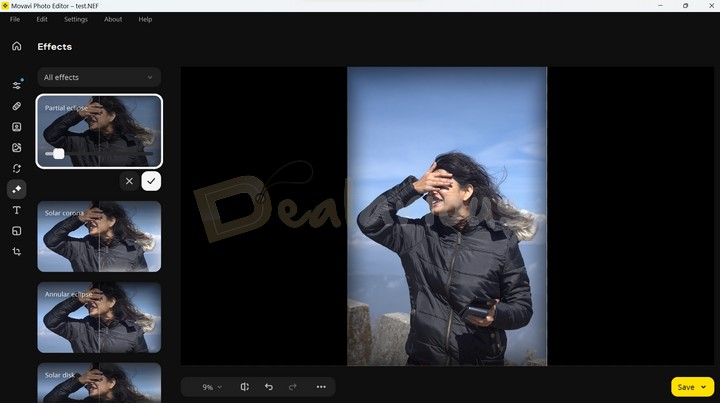
The Effects tab has filters you can apply to your photos to change the look and feel. You can choose from Artistic, Vignettes, Popular, Retro, Disco, and more. There are various filters to choose from.
Crop, Rotate, Resize
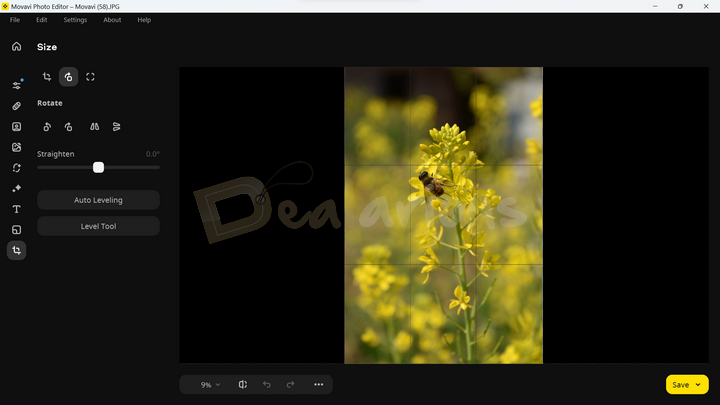
With the Size tool, you can crop the photo to your desired size or even in a fixed standard aspect ratio. There is even an option to rotate the photo and straighten the photo.
Also, you can resize a photo precisely in terms of Pixels, Percentages, Centimeters, and inches. Besides, there is an option for AI enlargement, where AI decides the photo size based on an algorithm.
Caption
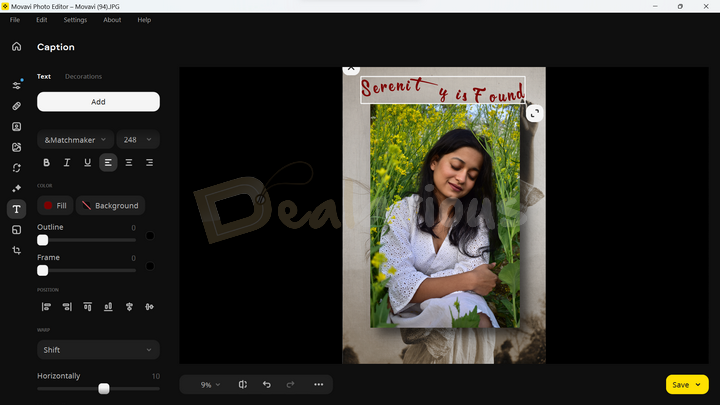
The Caption option empowers you to incorporate text into your images using diverse styles. You have the freedom to customize the font type, text color, frames, background, and outline colors, among other options.
One of the coolest functions of the Caption tool is its capacity to arrange your text in various styles, providing a playful and imaginative appearance.
Exporting
Movavi Photo Editor 2024 offers multiple file format options for exporting edited images, including JPEG, PNG, BMP, TIFF, DPX, PBM, PCX, PGM, and PPM.
Additionally, you can resize the image during the export process. However, it's crucial to be aware that changing the image size will unavoidably reduce resolution and quality.
Note: You cannot save your edits as a project in the application; they can only be saved as a media file.
Movavi Photo Editor Review: Overall Experience
What I Like
- The interface of Movavi Photo Editor is incredibly simple and intuitive, making it easy for individuals with little to no experience in photo editing. One aspect I particularly liked about the app is its apprehensive customized layout. The tools are placed at an eye distance, which makes the editing process smooth and stops you from having to look all over the app to find them.
- The AI Auto Enhancement is an extremely handy tool, making quick photo corrections without needing manual adjustments.
- Tools such as Erasing Objects, Background Removal, and Auto Retouching made the platform more convenient by producing results that closely resemble professional editing.
What I Dislike
- Although useful, the AI Adjustment tool is limited in its capabilities compared to similar AI photo editing apps, like Luminar Neo.
Movavi Photo Editor: Performance
The system specifications during the test of Movavi Photo Editor review:
- Processor - AMD Ryzen 5 3500U, 2100 Mhz, 4 Core(s), 8 Logical Processor(s)
- RAM - 12.0 GB
- OS - Windows 11 Home Single Language
- Graphics - AMD Radeon Vega 8 (Integrated)
Idle State
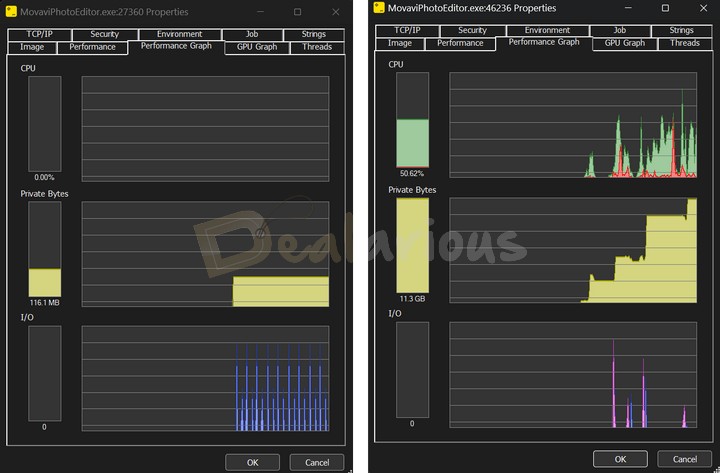
Movavi Photo Editor maintained a memory consumption of 116.4MB when unused, with CPU and GPU usage staying static at 0%.
Editing Process
Resource consumption significantly increased while applying several AI enhancement presets to an image during editing. The RAM usage spiked up to 11.3GB at times, averaging around 10GB, and CPU consumption peaked at 50.62%, while the GPU remained at 0%.
Unfortunately, during this AI enhancement process, the application experienced some unexpected lag, which was surprising given the usual performance of Movavi Photo Editor.
Impression
Although I thoroughly enjoyed using Movavi Photo Editor with minimal edits, it lacked powerful performance, especially while applying AI enhancement features. I'm hoping for improved performance in the latest updates.
How Good Is the Support?
Though the app is fairly simple to use across users of all levels, there might be times you require support. Reaching out to support is very easy.
Within the app, you find the help menu, which has 3 options:
If you have an issue beyond this, you can also raise a support ticket on this page that the Movavi team will answer. During my Movavi Photo Editor review, I got in touch with their live chat support, and it was quick and efficient. However, the email support took nearly 24 hours to respond to my queries.
Compared With Other Photo Editors
Below, I have compared Movavi Photo Editor with other editors like Luminar Neo and inPixio.
Luminar Neo
Skylum Luminar Neo is a highly effective photo editing software utilizing AI technology, which can compete with Movavi Photo Editor. It stands out with its advanced AI capabilities and enhanced manual controls, offering a comprehensive solution for most photo editing requirements. Learn more in this Luminar Neo Review.
Meanwhile, Movavi Photo Editor is an easy-to-use and lightweight tool that has a really cool feature- it can bring old photos back to life with its Old photo restoration. If you seek a seamless photo editing experience on a low-spec device, Movavi Photo Editor is the ideal choice.
inPixio
inPixio is a quick and easy-to-use photo editing tool. It comes with a host of photo editing tools, including skin retouching, color adjustments, photo collages, background removal, etc., to make your workflow easy and convenient.
Like Luminar Neo, inPixio is also a worthy competitor of Movavi Photo Editor. However, Movavi's versatility, easy-to-use interface, and affordable pricing make the platform stand out.
Is Movavi Photo Editor Worth Your Money?
Considering all the features, I recommend it at the end of this Movavi Photo Editor review. Movavi Photo Editor is good for you if you require professional-level photo editing and are short on time, skillset, and budget.
The kind of features that Photo Editor 2024 offers at such a price point makes it a completely 'must-have' tool and definitely worth your money. However, I would also like more improvements to the Photo Editor AI.
Sourojit is Executive Editor at Dealarious. Rumor says He is Computer Science Engineer; He neither accepts it nor denies it. Tech Explorer, Philosopher and a Storyteller.