I have always craved good video editing software that offers powerful features without a steep learning curve. After trying several video editing applications, Wondershare Filmora became one of my favorites.
In this Wondershare Filmora review, I will share why Filmora has become one of my go-to editing tools and whether it can meet your video editing needs.
Quick Summary
Pros
- Short learning curve
- Advanced Video Editing Features
- Interactive UI
- Advanced Color Grading
- Instant Video Editing Modes
- Integration of Nano Banana and Veo 3.1
Cons
- Limited Plugin Support
- Some advanced tools take time to master
- AI Smart Short Clips showed minor performance lag.
overall
USD 49.99
Supported Platforms: Windows, OSX
Interface
4/5
Features
4/5
Performance
4/5
Support
4/5
Before diving deep into the Wondershare Filmora review, I want to give you a quick rundown of why I found the program convenient.
- First, Filmora's interface makes it easy for individuals with varying experience levels to navigate and access all the features and tools without any complication.
- You can put your creativity to work with Filmora's basic and advanced-level toolsets with ease.
- Last but not least, its introduction to AI features makes video editing more efficient and less time-consuming.
With that said, let's get started with the Wondershare Filmora review.
Pricing Plans
In Wondershare Filmora, you can choose between these three plans.
- Basic Plan: USD 49.99 per year
- Advanced Plan: USD 69.99 per year
- Perpetual Plan (One-Time Fee): USD 79.99
Users with a Perpetual license will get access to all the advanced features, including free updates for a particular version. However, major version updates are not included. It means that all minor updates, like version 14.1 to 14.2, are free, but major upgrades, like version 14 to 15, are not included in the Perpetual plan. The yearly plan includes all free updates as well as major upgrades. The cross-platform plan will allow you to use the program on multiple platforms/OS.
Our Wondershare Filmora coupons, offer great discounts on Perpetual license plans.
Filmora also offers a free trial version of the program that you can use forever but with limitations.
System Requirements
Before you buy Wondershare Filmora for your computer, it's crucial to check if your system meets the specifications below.
- Supported OS: Windows 7 and above, Mac OS 10.15 and above (64bit).
- RAM: A minimum of 8 GB RAM and 16 GB is recommended for heavy editing.
- Disk Space: A minimum of 774 MB of free hard disk space for installation
Note: An SSD (Solid-State Drive) on your system is recommended for a smooth HD and 4K video editing experience.
I recommend reviewing Filmora's System Requirements page to get a detailed view before purchasing.
Wondershare Filmora: User Interface Review
Filmora features an intuitive, user-friendly interface with no hidden menus or complex feature structures. Furthermore, it aims to enhance the user experience and attract new users.
Filmora Dashboard
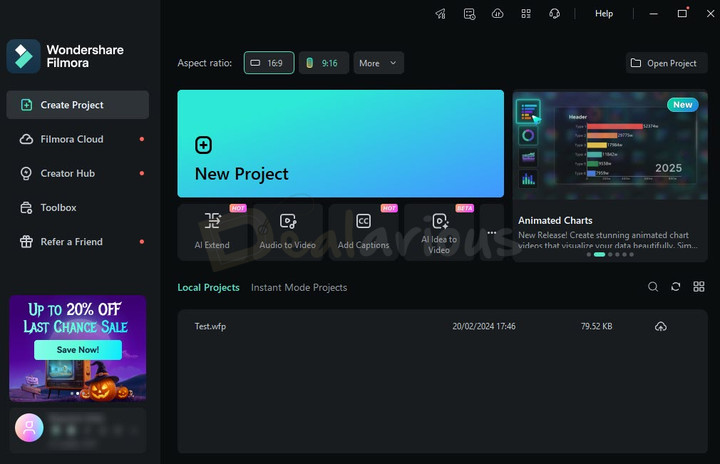
The dashboard of Wondershare Filmora is intuitively organized. On the left side of the dashboard, you will find five options to get started with your video editing journey.
- Create Project
- Filmora Cloud
- Creator Hub
- Toolbox, and
- Refer a Friend
On the Create Project tab, you can start editing videos from scratch by clicking on the 'New Project' section. Furthermore, below that, you can find other quick tool options like:
- AI Extend (New)
- Audio to Video
- Add Captions
- AI Idea to Video (New)
- Text to Video
- Smart Short Clips
- Smart Scene Cut
The features in this section dynamically change based on your recent usage.
There's also a dedicated projects section that helps you quickly get started on your unfinished editing tasks. You can also set the aspect ratio of your video project before getting started by navigating to the top left corner of the creative project window.
If you are creating short-form videos that require a 9:16 aspect ratio, I recommend selecting the same aspect ratio from the dashboard. This choice will allow you to create a video project specifically tailored for short videos and an editing window optimized for them.
Editing Window
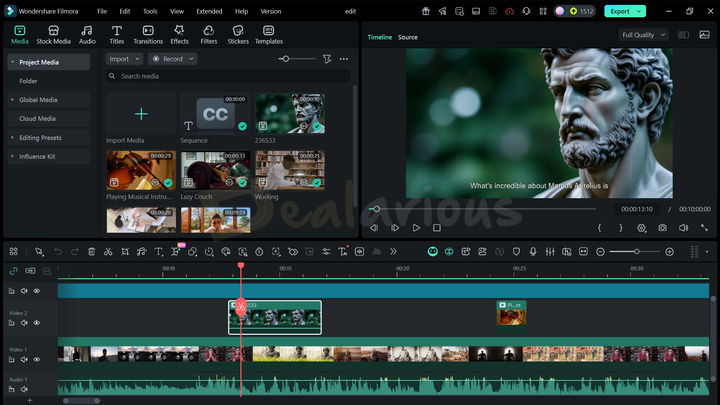
Upon clicking the 'Create a New Project' tab, the program opens the editing window. The interface layout is similar to that of other video editors. Still, Filmora distinguishes itself by offering six different layout options for editing—a feature not commonly found in other software.
All the features in Filmora are conveniently accessible on the home screen, allowing you to utilize them intuitively for efficient video editing. Performing tasks like trimming, audio adjustments, adding transitions, and visual effects in Filmora is straightforward.
The program offers a magnetic timeline approach that simplifies adding clips to your Project. When you drag a clip onto the timeline, the program seamlessly connects it to the previous clip, eliminating any space in your movie. Additionally, Filmora supports multiple timelines, allowing you to make instant changes across different tracks and preview them in real time.
You can easily resize and expand the editing timeline using the Ctrl+mouse wheel or navigate back and forth with the Alt+mouse wheel, which I found handy. Additionally, you can fit it to the panel or use Zoom In/Out buttons.
There's a quick toolbar section right above the timeline for easy access to features like Undo, Redo, Delete, Split, Crop, Audio Stretch, Quick Text, AI Extend (New), Silence Detection, AI Text Based Editing (New), etc. You can further customize the toolbar by simply dragging and dropping items to it based on your preference.
Editing Experience
Navigating through the features and implementation of each function didn't pose any issues for me. One aspect of my editing experience that I particularly enjoyed was the ability to change the video's aspect ratio directly within the program's editing window. This feature streamlined the editing process and enabled smooth adjustments across different platforms and display formats.
Another aspect that I found highly useful is Wondershare Filmora's Rendering Preview feature. It lets you render the entire timeline, so you can preview the final product before exporting, ensuring a smoother and more efficient workflow. Furthermore, the Video Scope feature is another noteworthy addition to the program. It enhances the professional video experience by offering four video scopes: Parade, Waveform, Vectorscope, and Histogram.
Overall, during my Wondershare Filmora review, the program provided a positive editing experience with its user-friendly interface, well-organized timeline editing, and convenient customization options. Working with the advanced features may require some initial guidance. However, once mastered, the program offers many tools and capabilities for creating high-quality video output.
Starting with video creation and editing? Check our Tips & Tricks to Edit Videos Like a Pro
Wondershare Filmora Review: Key Features
With the blend of AI and advanced editing controls, Wondershare Filmora helps you create exceptional videos. Here is a detailed explanation of the key features:
Here is a detailed explanation of the key features available in Filmora:
Basic Editing Features
Trimming
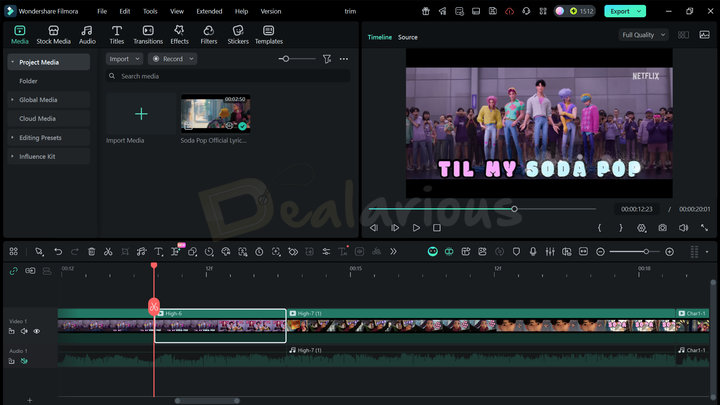
Trimming allows you to shorten your video clips by removing unnecessary sections from the main footage. Filmora provides two straightforward methods for trimming videos. You can:
- Drag the edges of a selected clip in the timeline to adjust its start and end points, effectively removing unwanted parts.
- Utilize the Split Tool to cut between clips, separating them and removing the portions you don't need.
Additionally, Filmora lets you trim videos using in-and-out cuts directly in the preview panel. It lets you preview the selected portion of the video and make precise cuts at specific points, ensuring your edited clips align with your intended visualization.
Effects, Transitions, and Filters
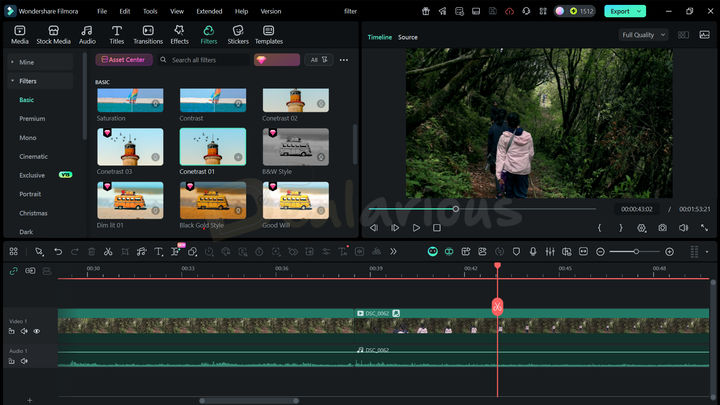
Filmora offers a wide range of graphical effects, including overlays and LUTs. These effects can greatly enhance the overall quality of your videos. You can effortlessly apply these effects to your videos using files from your computer or the program's built-in collection. Applying these effects and transitions is as simple as dragging and dropping them onto the timeline and over a sequence. You can also add transitions between two clips by clicking the plus button in the transition effects panel at the bottom.
Additionally, Filmora's latest release, Filmora 15, has introduced the Animated Charts feature in its effects pack. Using it is as easy as uploading your data in XLSX or CSV Format (up to 1MB) and customizing the chart's visual elements. You can choose from 10+ chart presets and tweak their color palette, font style, labels, background, gridline, Format, animation, and much more. Filmora processes uploaded files locally, so you don't have to worry about privacy concerns with your data.
Color Grading
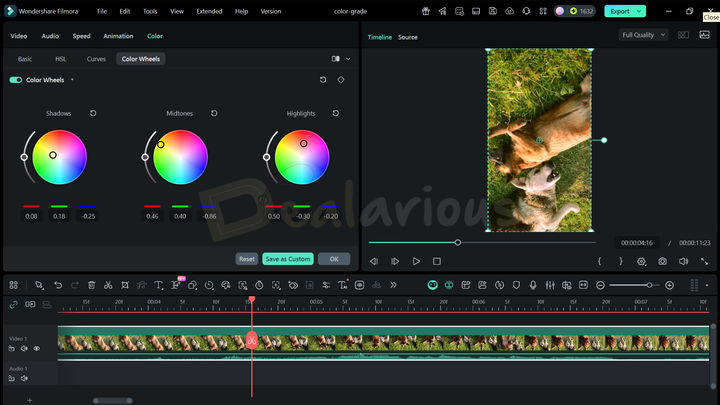
Apart from basic color adjustment controls, Filmora offers individual control over each color, curve adjustments, and color grading wheels. It allows you to adjust and enhance your video footage's overall color balance and appearance.
The inclusion of this feature in the application impressed me with its precise ability to achieve professional-looking color grades.
Audio Adjustment
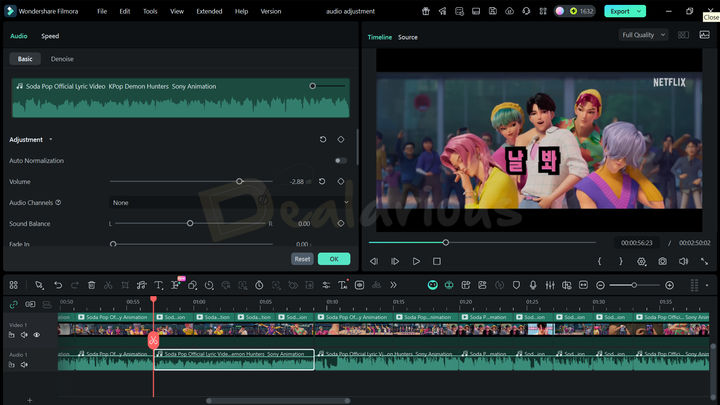
I love Filmora for its flexibility in providing precise control over different parts of the video editing process, and audio is no exception. Using Filmora's audio control tools, I could easily adjust volume levels, add smooth fade-ins and fade-outs, tweak pitch and speed, use keyframes for dynamic, detailed audio transitions, and more. Amid all these, two tools stood out to me the most: AI Voice Enhancer and Audio Ducking.
The AI Voice Enhancer was effective for quick cleanup of voice recordings. It can make them sound clearer and professional. The Audio Duck tool, on the other hand, can lower the background music to highlight the primary audio, making it more prominent and crisp.
Tip: When making audio adjustments in Filmora, it is important to separate the audio from your video clip to gain greater control over the editing process.
Green Screen

The Green Screen or Chroma Key module in Filmora goes beyond handling traditional green or blue screen applications. It lets you key out any color to create various video effects.
This module offers a range of settings, like adjusting Tolerance, Edge Thickness, Edge Feather, etc., that provide further adjustments to fine-tune your green screen videos and achieve the desired results.
Adjustment Layer
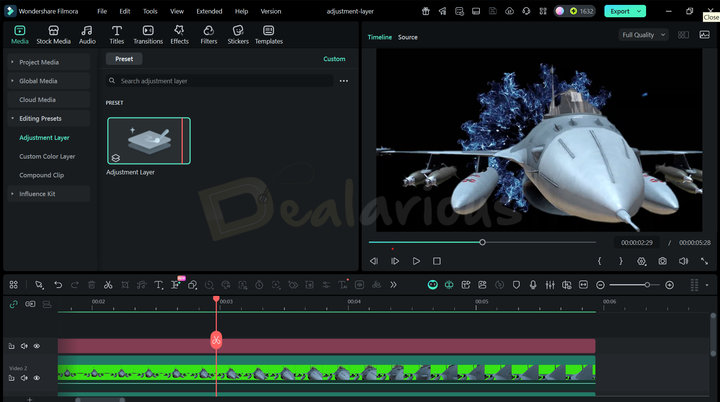
The Adjustment Layer feature in Filmora functions as a transparent overlay on the timeline, affecting all clips below it. You can add multiple Adjustment Layers and stack them as needed to achieve the desired visual effects and enhancements. Using the Adjustment Layer in your timeline, you can conveniently apply various effects, color corrections, filters, and other adjustments to all the clips beneath it simultaneously.
Advanced Editing Features
Speed Ramping
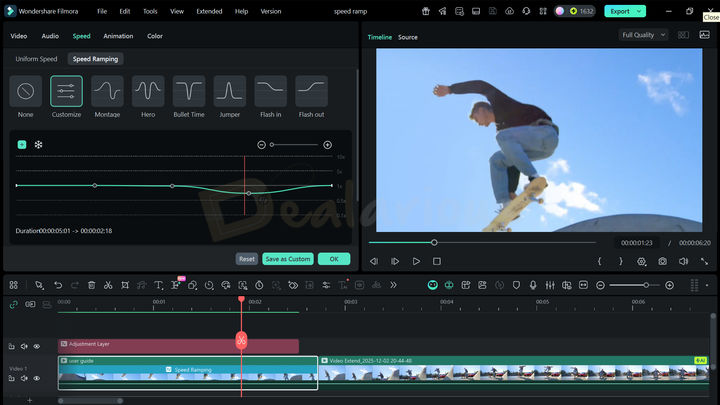
Filmora's versatile speed ramping feature provides an opportunity to enhance your video editing capabilities and create more impactful visual narratives. It allows you to manually adjust the speed by setting keyframes and specifying the desired speed at specific points within the clip.
Moreover, if you want to spice up your video with seamless transitions without manual tweaks, you can benefit from Filmora's AI Frame Interpolation feature. It can create smoother video frames, making your video look more appealing. Additionally, to broaden your creative horizons, you can use two other features: freeze frame and reverse speed.
Motion Tracking
Having used advanced video editing programs like Premiere Pro before, Filmora's Motion Tracking feature felt like a lifesaver. I really enjoyed the flexibility to effortlessly adjust and resize the tracking box frame by frame for precision, then apply text, effects, and other elements to track the object. It was a pure blend of automation and manual control, making the task efficient and creative.
Keyframing
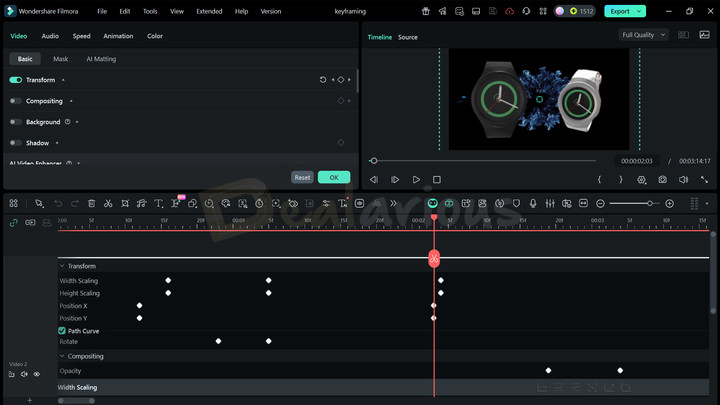
Let's address the elephant in the room: Wondershare Filmora's Keyframing tool. With the Keyframe Graph Editor, you can create smooth animations with just a few tweaks here and there.
This feature lets you customize multiple keyframe points and control video elements, such as scale, position, path curve, and opacity. The flexibility further helps elevate the visual appearance of your video, especially animation. Additionally, the Keyframe panel offers a variety of graph options, including Continuous, Basic, Ease in, Ease out, Linear, and Freeze. You can choose and apply these curves to ensure a seamless video motion.
However, working with this tool can be a little tricky, especially for beginners. Additionally, since keyframing adjustments are made directly from the timeline, it can feel cluttered and difficult to manage on small screens.
Tip: Try adjusting the timeline height or switching to 'Timeline' layout mode. This small tweak can give you enough room to comfortably adjust and play around with the keyframes.
Dual Timeline-Editing (New)
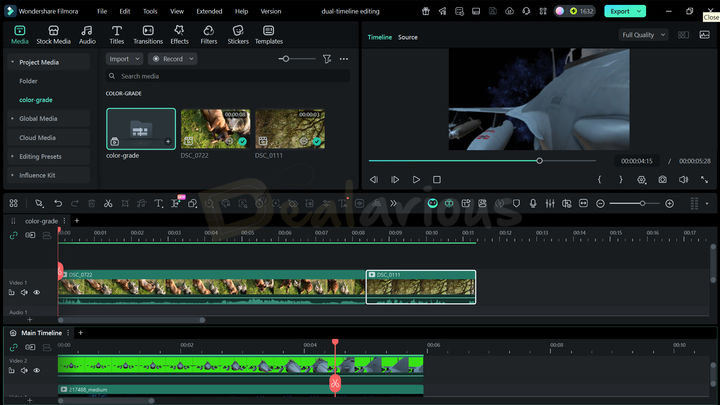
If you have ever worked on an element-heavy project, you know how crowded the timeline can get. With its dual-timeline editing approach, Filmora aims to resolve this issue. This feature helps you keep things organized by breaking your projects into smaller sections, rather than overloading a single timeline.
For example, imagine you are working on a commercial video that includes multiple clips, audio design, and heavy animations. In this scenario, you can divide the work into two parts.
Keep the video and audio assets in the main timeline, and create a compound clip for all your animation elements in the second timeline. You can easily hop between timelines and copy and paste elements across them, helping you maintain an organized workflow. If you need a broader view, simply drag a compound clip over the main timeline to activate the dual timeline mode. In this mode, you can seamlessly work on both timelines simultaneously.
Then again, if you are working on a smaller screen, then this approach can feel overwhelming. Rather, stick with the compound clip method for a more comfortable editing experience.
Pen Tool (New)
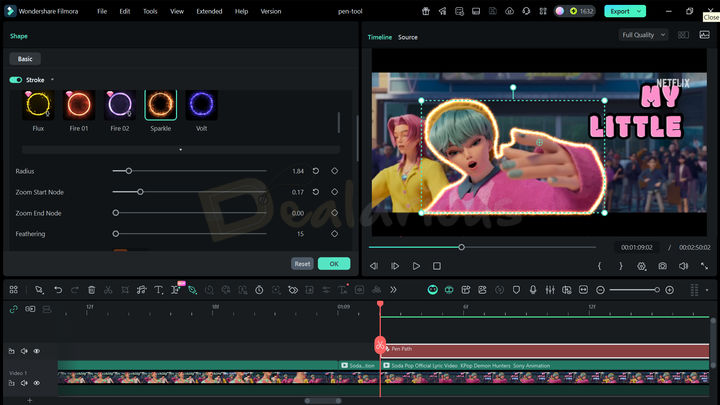
It is one of my favorite tools introduced in the latest Filmora update. With the Pen tool, you can trace a custom shape around any object or area in your clip, then style the outline with ease. For styling, you can either use Filmora's preset effects or solid colors. You can further fine-tune the outline by adjusting options such as radius, zoom start/end nodes, feathering, and color adjustments. For sleek motion animation, you can also tinker with the keyframes to give your video a really cool look. The tool is simple to use, but it works best on static or single-frame subjects/objects rather than those that move too much.
Project Management and Sharing
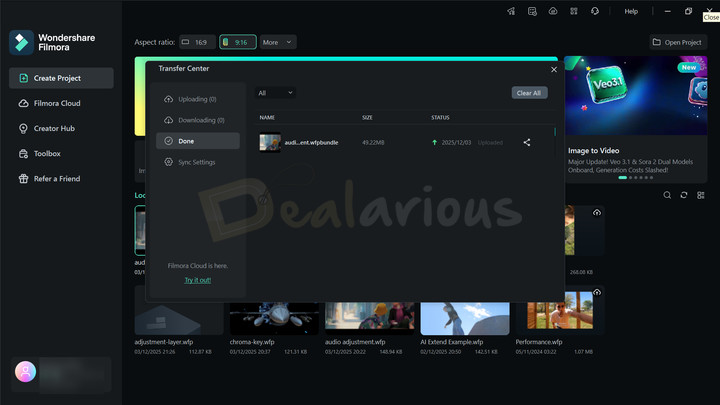
Filmora comes packed with cross-platform capabilities, allowing for effortless transfer and helping continue your half-done video projects across different devices. The software provides a seamless cloud-based collaboration experience, allowing you to easily work with your team of video editors and reviewers. Using the Wondershare ID, you can conveniently back up all your imported media files, favorite effects, project files, custom-created titles, and more. This feature is highly beneficial, as it ensures the safety of your critical clips and assets, which can be retrieved at any time using your unique Wondershare ID.
Multi-Camera Editing
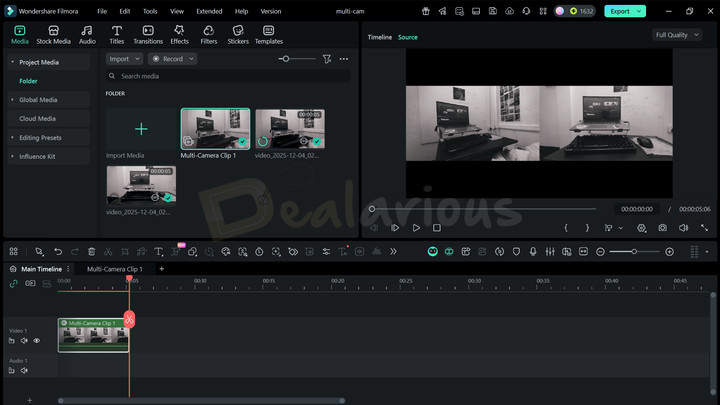
This feature can be very effective if you want to blend multiple camera angles into a single piece of footage without going through a tedious, time-consuming process. However, during my Wondershare Filmora review, I found this feature to be a little tricky to grasp at first. It will take some practice and some guidance from YouTube tutorials to use the Multi-Camera Editing feature correctly. Once learned, this feature can save loads of time by blending multiple camera angles into a single frame for a smooth, engaging viewing experience.
AI Features
Filmora includes a range of AI tools to speed up and improve your video editing. Below are some of the AI tools that I found particularly useful.
AI Extend (New)

It is a game-changing tool I encountered in the latest Wondershare Filmora update. With this tool, you can extend your video clip by up to 8 seconds with a single prompt. The more detailed your prompt, the better Filmora generates visuals with AI and seamlessly blends them into the extended part.
Text to Video (Veo 3 integration)
Filmora's AI Text-to-Video feature automatically creates videos from scripts and prompts, eliminating the need to manually add video or music. Additionally, its integration of Google Veo 3 ensures you will get high-quality output.
AI Planar Tracking
With this feature, you can allow objects to track the movement of a flat surface within the video, such as Billboards, laptop screens, or even a moving element.
I am in awe of this feature introduced by Filmora. The inclusion of AI Planar Tracking made the tracking task really easy. To track a moving or non-moving surface, all I needed to do was click AI Planar Tracking, select the surface I wanted to track, and, once the tracking was complete, embed an element that would move with the selected surface without any complex adjustments.
AI Smart Cutout
In my review of Wondershare Filmora, I found the Smart Cutout feature to be both effective, quick, and precise. Using the tool was easy. I simply brushed over the subject I wanted to cut, and Filmora handled the rest of the background removal process. Additionally, for manual scene-to-scene cutouts, the Advanced Mode proved very helpful.
Tip: The AI Smart Cutout feature works best with static shots or footage with minimal movement. If you try cutting out subjects from high-motion scenes, it can take multiple adjustments and a significantly longer processing time to achieve even a near-perfect result.
Smart Short Clips
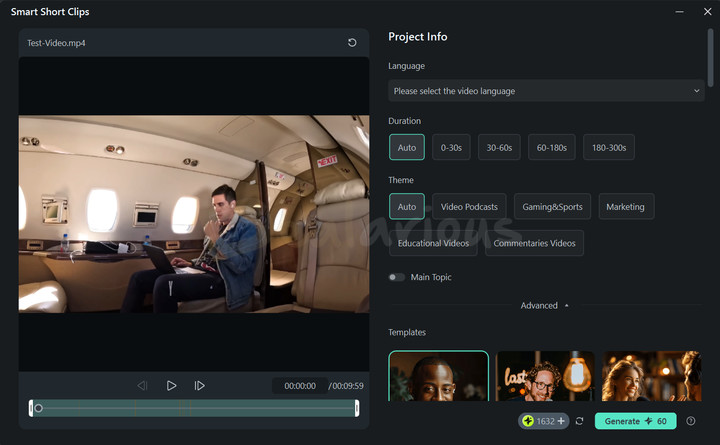
It is a helpful tool for content creators focused on creating short-form videos. Using AI Smart Short Clips, you can create a short video from long-form footage or by pasting a YouTube link. You can also adjust language preferences for subtitles, content duration, theme, aspect ratio, and Template to help Filmora generate the final result you envision. If you want more control, you can manually edit the generated clips once processing is complete.
During my test, the program produced 6 videos from a 10-minute-long footage. Each video was around 35 seconds long and featured different, unique contexts. I really liked this variety.
Contrary to my past experience, this time the process did not go as smoothly as I expected. Filmora occasionally crashed when I tried to open the generated videos in the editor, uploads sometimes stopped, and there was noticeable lag when I was scrolling through the results. While the tool is quite effective, this flawed experience made me second-guess using the feature again.
Smart Scene Cut
This feature offers a smart, efficient way to cut multiple scenes at once. The process is simple: highlight upto 10 objects or subjects in your footage, and Filmora automatically hunts down every scene where they appear. You can then manually choose which scenes to keep and refine the video further in the full-fledged editing workspace.
The Smart Scene Cut feature is especially helpful when you already know the key moments you want to extract from a video. However, during my test, the program struggled to cut out scenes from a 10-minute video. But on the other hand, the feature performed well on a 3-minute footage with clear, recognizable faces highlighted.
Overall, what I observed is that for longer or more complex footage, processing may slow down or become less accurate.
Other Noteworthy Features
In addition to the advanced features mentioned above, you can benefit from Filmora's other useful AI and advanced toolsets to improve your video editing efficiency and overall experience. It includes features such as:
- AI Translation
- Idea to Video (New)
- Image to Video (New)
- AI Object Remover
- Auto Reframe
- Screen Recorder
- Instant Mode
- AI Audio Denoise
- Auto Beat Sync
- AI Color Palette and more.
Wondershare Filmora: Export
Wondershare Filmora offers an extensive selection of export formats, allowing you to choose the one that perfectly fits your project requirements.
- Local: This option allows you to create video file formats commonly used for local storage or playback.
- Device: It offers presets tailored for popular video-viewing devices such as iPhones, iPad, and smartphones.
- YouTube, TikTok, and Vimeo: These options are optimized according to the latest best practices for uploading videos to these specific online platforms.
- DVD: This option enables you to create standard MPEG2 files suitable for burning DVDs, with the ability to burn the discs directly.
Each export option includes a default set of parameters and file types, optimized for their intended purposes. However, you can fully adjust these settings according to your preferences. You can also directly upload the media file to Filmora Cloud during the export.
One aspect I appreciate about the export panel is the inclusion of thumbnail pictures, which is very thoughtful. Under the Thumbnail section, click the edit button to start creating your own customized thumbnail with the help of AI. You also have the flexibility to do manual tweaks.
Tip: For thumbnails, start with a template from the template gallery and customize it for better results.
Wondershare Filmora Review: Performance
The system specifications during the test of Wondershare Filmora Review:
- Processor: AMD Ryzen 5 3500U, 2100 Mhz, 4 Core(s), 8 Logical Processor(s)
- OS Version: Windows 11 Home Single Language
- RAM: 12GB
- Disk: 512GB SSD
- Graphics: AMD Radeon Vega 8 (Integrated)
Idle State Resource Usage
During the idle state, the CPU usage was minimal, occasionally spiking upto 8.14%, and the RAM utilization was constant at 2.9 GB.

The GPU usage reached 471.0MB in the idle state.

How I Tested
For the test, I added a 10-minute 2K HEVC video at 23.98 FPS and incorporated small 1080P clips. During the editing process, I did not encounter any noticeable lag, even when applying elements such as transitions, effects, Speech-to-text, etc. There was no loud fan noise, even though I kept a few tabs open in the background for other tasks.
Export Settings
- Video Length: 10 Mins (Trimmed Down)
- Format: MP4
- Quality: High
- Resolution: 1920X1080
- Frame Rate: 30 FPS
- Size: 729 MB
- GPU Acceleration: Enabled
Exporting Process
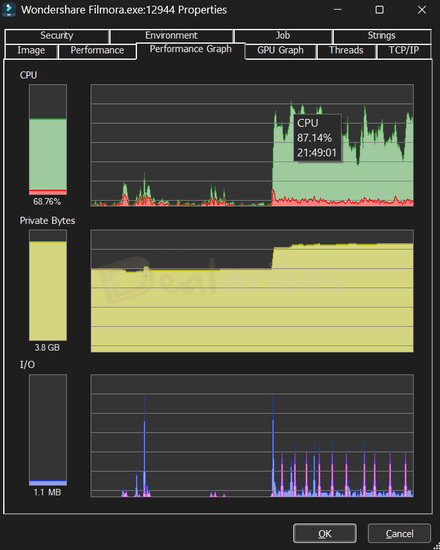
The exporting took around 20 minutes to complete. Filmora's CPU usage fluctuated between 50% and 85%, peaking at 87.14%. RAM consumption spiked upto 3.9 GB and remained steady throughout the export process.
Additionally, the GPU peaked at 488.6 MB before dropping to 471.1 MB.

Remark
As I kept the editing minimal, the experience went smoothly for me. However, if you work on an element-heavy project, especially on a low-specification device, the result can be different.
How Good is the Support?
Wondershare Filmora, like other Wondershare products, offers excellent software support. They have a helpful AI bot, email support, and live chat. The AI bot is useful enough for simple product and feature-related queries. However, for complex and technical issues, it's best to reach out to human agents through live chat or by creating a support ticket. You can expect prompt replies from the live agents during their active hours.
You can also refer to their user guide and YouTube Channel to better understand the product. However, should you encounter an urgent situation, you can request a callback from their support assistant via the Wondershare contact page.
Wondershare Filmora Review: Overall Experience
What I Like
Filmora caught my attention primarily for two main reasons.
- It offers a comprehensive suite of essential video editing tools and features. It covers all the necessary aspects of video editing, including a vast library of stock multimedia files, keyframing, motion tracking, transitions, etc., that you would require for your video project.
- Filmora has a short learning curve, which makes video editing quick, easy, and efficient for users of all levels. Its standout functionality lies in its beginner-friendly design, which removes the complexities of using editing tools, curves, and shortcuts.
- During my Wondershare Filmora review, the AI features processed exceptionally well and quickly, which is a plus.
What I Dislike
Although the program functions well as an efficient and user-friendly video editor with comprehensive editing capabilities, I have encountered several things that could be improved during the editing process.
- Mastering features like speed ramping, freeze-framing, and other advanced tools can feel somewhat complex.
- The application's graphical effects and plugin support are limited compared to other professional video editing software options.
- I was disappointed with the occasional crashes and lags I faced while working on the AI Smart Short Clips feature. I hope Wondershare looks into this matter and fixes it in the upcoming updates.
Alternatives
Movavi Video Editor
Filmora and Movavi are strong rivals in video editing. Movavi Video Editor is designed for beginners and intermediate users, offering various features like trimming, merging, cropping, etc. It has better audio effects than Filmora. You can learn more about this program in our Movavi Video Editor Review.
While both programs include AI tools for fast, efficient video editing, I found AI features in Filmora to be more robust and advanced than those in Movavi. Additionally, Movavi is cost-effective and runs smoothly on computers. For a detailed breakdown, check our Filmora Vs Movavi Video Editor comparison.
Movavi Video Editor doesn't include an inbuilt screen recorder. For that, Movavi has a separate Movavi Screen Recorder program. However, the Screen Recorder feature also comes bundled in the Movavi Video Suite package. Learn more about the all-in-one suite in this Movavi Video Suite review.
However, Filmora excels in advanced features, such as HEVC support and screen recording, along with its new additions mentioned in the article. These capabilities make Filmora a top choice for more experienced video editors.
AVS Video Editor
Filmora and AVS Video Editor are two popular video editing programs, each having its own strengths and weaknesses. AVS Video Editor is known for its simple and easy-to-use interface. It provides basic video editing tools, along with a great addition of the chroma key feature.
AVS Video Editor is included in the AVS4YOU Unlimited subscription package, which you can get at a reasonable price. For more details, check out our AVS4YOU Review.
While AVS Video Editor works well for basic video editing, it lacks the powerful features and high-quality results that Filmora offers. Filmora stands out with its impressive features and excellent video outcomes. Also, AVS Video Editor is available for Windows PCs only, and Filmora is available for Windows and Mac.
Adobe Premiere Pro
Experienced editors and content creators favor Adobe Premiere Pro for its advanced features and professional workflow. It’s a great choice for complex projects, offering various tools, effects, and customization options. However, it requires a powerful computer to run smoothly.
On the other hand, Filmora is more beginner-friendly and budget-friendly. It can still produce satisfactory results on a low-budget PC while providing access to some advanced features.
Checkout our Best list of easy to use Free & Paid Video Editors for Beginners.
Frequently Asked Questions
Is Filmora suitable for beginners?
Yes, Filmora is specifically designed with beginners in mind. With its user-friendly interface and simplified editing tools, beginners can learn and use the software with ease.
Can I use Filmora on different operating systems?
Filmora is compatible with both Windows and Mac OS, allowing users to use the software on their platform of choice.
Conclusion
Over the years, Wondershare Filmora has done an impressive job of adding many advanced features without compromising its user-friendly nature, which is truly remarkable. It offers a great balance of being easy to use while providing a wide range of editing tools, making it suitable for users of all skill levels. As a video editing enthusiast, I would highly recommend this program to anyone seeking a budget-friendly video editing tool that offers both quick and advanced features.
Have you used Wondershare Filmora? I'd love to hear about your experiences and thoughts in the comments below. Let's continue the conversation deeper into the world of video editing together.
Changelog

She reviews software at Dealarious, mostly recovery and productivity tools, which she tries out herself. Her goal is to keep things simple so readers don’t waste hours figuring out what works. Over the years, she has tested dozens of apps and learned that small details often make the biggest difference.
When she isn’t testing programs, you’ll usually find her hiking in the mountains or enjoying the rain. She believes good tech should quietly make life easier, not more complicated.
Filmora is an awesome multimedia editor. My biggest complaint is the deeply imbedded “buy this, buy that” Nagging. I Paid for this program. REMOVE the #$%$#$% ads! Also, on that same note, Sorting through the assets to find one that you don’t have to pay more for is pulling teeth. It’s their ridiculous greed. Is there a way to remove all of the extra cost content. I am more than impressed with the base program, buy not likely to refer it to anyone for the above reasons. When I find a program that I like I’m happy to pay for it, but this type of built in BS prevents me from investing anymore of my money into their greedy pockets. Maybe next time I’ll just torrent a Hacked copy. Change my mind.